Last week, I jumped into our 2000 Toyota Tundra pickup truck to go to an appointment, and instead of the usual surefire start, all I heard was a single “chunk” from under the hood. After some troubleshooting steps, I realized that the starter solenoid had gone out, so I thought, “sure…a starter is really easy. Crawl under the truck, a couple of bolts, attach the wire and that’s it.”
Wrong.
The Toyota Tundra, with the 4.7 liter engine, demurely wears its starter buried deep beneath the intake manifold, like some sort of Victorian corset. In other words, the starter is basically inside the engine. Normally, I would not write about something as mundane as engine repair on an otherwise light-hearted travel blog, but I realized that there may be others out there with the same problem who could benefit from a how-to from a non-mechanic’s viewpoint. I know enough about engines to know the general theory of how they work, where to pour the oil, etc. Fortunately, I’m also pretty fearless when it comes to general mechanical and structural work. Given the proper instructions and tools, I believe I can tackle almost anything.
Initially, Miss Fish and I decided to save the hassle and have a pro do the work. The dealer wanted almost $1000 to replace the starter, and the local independent shop quoted $1500. That shock sealed the deal for us; we opted to do it ourselves. Keep in mind that the last time I went into an engine, it was to adjust the carburetor, replace the points, change a manifold gasket, clean spark plugs, and adjust the timing. In other words, it was a long time ago in a bygone era, back when fuel injectors were some sort of esoteric thing seen only in fancy cars with unpronounceable, Italian names.
Let’s get started.
This how-to is written for the 4.7 liter Toyota engine, also known as the 2UZ-FE engine. If this isn’t the engine in your Toyota, then I assume you’re only reading this for pleasure–in which case, you’re a strange duck and we like the cut of your jib.
Assumptions:
- You’re not a professional mechanic or someone skilled with auto repair. If you are, then this how-to will only insult your intelligence.
- However, you need to have some level of familiarity with what’s under the hood. If you don’t even know how to change your oil, then this isn’t the job for you to be doing.
- You’ve definitively diagnosed (or have had diagnosed) the problem as the starter and/or starter solenoid and not a starter relay or a dying battery, or any of the other myriad reasons why a vehicle won’t start.
- You have a rudimentary knowledge of tool usage. If I say “Torque Wrench,” you should not feel nervous or sweaty.
- You have no problems saying “I’m stuck” and asking a more-knowledgeable person for help if necessary. If you’re lucky, you have a mechanically-inclined friend who’d be willing to help you out for an afternoon.
- You’re not a concert soloist or a surgeon. You will get scraped knuckles from this.
- You understand that this is a record of my experience only, and is not an official guide. You already know that we’re imbeciles under the hood. If you’re using my notes as a definitive guide, then you’ve been warned.
- By undertaking this project yourself, you run the risk of rendering your vehicle unusable. You run the risk of setting your vehicle on fire. You run the risk of over/under-tightening bolts and breaking very expensive parts. You run the risk of bodily injury to yourself. And, there’s a whole universe of other things that can go wrong.
- At some point, you will be climbing into your engine compartment. Be careful where you sit, and watch where you set your hands/feet/butt. It’s easy to break something, snap off a connector or sensor, or bend a tube. Get some padding to rest your knees/butt on. The edges get uncomfortable.
- The same model of engine can have small differences from year to year, so your own situation may vary.
- Keep in mind that Miss Fish did about 50% of the work on her own, and she has zero mechanical aptitude. It is possible to do this job.
Before-the-job steps:
1. Know what you’re getting into and understand that you’ll be spending several hours being intimate with the guts of your truck. Visit the various bulletin board sites for helpful information from people who know what they’re doing. The problem is that if you don’t know what you’re doing, like Miss Fish and me, then you’ll waste a good deal of time wondering what a “throttle body” is. I found the most helpful information in a long thread on tundrasolutions.com and some pictures in another thread at YotaTech. Read through and get a feel for what’s involved. The folks at the parts desk at your local dealer also may be a good resource. At least the guys at our local dealer were.
2. Sign up for a two-day membership ($15) at techinfo.toyota.com, also known as “TIS”. This will give you access to lots of diagrams, and general steps to disassembly and assembly. Search the library tree for the information on the 2UZ-FE engine. Ignore the other engine model(s). You’re looking for information on “Engine” and “Starter.” Download, save, and print out the PDF files. I found the component schematics and torque specifications most helpful.
3. Order your parts. You’ll need to spend a little money to fix your truck. Order your parts from a dealer or a reputable source, and use “Denso”-brand parts. Those are the parts already in your truck.
Starter: There are two different starters available for your engine, and either one will fit. The “normal” starter is the 1.4 kilowatt model. That’s what I had in my truck. There’s also a 2.0 kilowatt starter, which is more powerful and beneficial if you live in a cold area. You can either replace the entire starter ($260) or just attempt a replacement of the solenoid contacts inside the starter ($20).
I opted to upgrade my whole 1.4 kilowatt starter with the 2.0 kilowatt model. If you decide to only replace the contacts, you’ll need to research further information on contact replacement elsewhere, such as tundrasolutions.com. Keep in mind that replacing the solenoid contacts may not solve your starter problem if the problem is not the contacts. It would be a major pain in the neck to reassemble your engine only to find that your truck still doesn’t start.
Gaskets: You have an option here just to reuse the gaskets you already have in the engine or get new ones. I opted for new gaskets. Now that I’ve been into the engine, I realize that reusing the existing gaskets is a reasonable decision.
Final shopping list:
– 2.0 kilowatt Starter ($260, plus $30 deposit)
– Intake manifold gaskets x 2 (one for each side) ($30 each)
– Throttle body gasket ($27)
If you order parts from your local dealer, have your VIN number ready. They’ll know exactly what specific part numbers you’ll need based on the VIN. You can locate the VIN number on the inside of the driver’s side door pillar.
When you pick up the parts, save your receipt so you can get the $30 deposit refunded when you return the old starter. Return the old starter inside the same box in which you got the new one.
4. Tools you’ll need This is a list of every single tool we used. Everything is metric on the Tundra.
- Box wrenches: 8mm, 10mm, 12mm, 14mm, 22mm
- Adjustable wrench
- 3/8″ ratchet handle
- Standard-depth sockets: 10mm, 12mm,14mm
- Deep sockets: 12mm, 14mm
- 3/8″ socket extensions: 3″, 6″, and 12″
- Torque wrench, capable of between 13 ft/lbs and 29 ft/lbs. The folks at the local auto parts store should be able to help you learn how to use one if you don’t know how.
- Needle-nosed pliers. Squeezing hose clamps and general holding-on-to-things.
- Large and small flat-blade screwdrivers. We gently–that’s gently–used these for the connector catches that refused to budge with finger pressure alone.
- #2 Philips-head screwdriver. Used to remove the hose clamps on the air intake.
- A Shop-Vac. You’ll use this to suck up crud from around the openings in the cylinder head.
- A bag of rags. You’ll need at least 10 or more clean rags to sop up gas from disconnected fuel lines and plugging up the openings in the cylinder head to keep piston-destroying trash out of your engine.
- Very important: a telescoping, magnetic retrieval tool. You will need this. Trust me.
- Flexible, lighted grabber tool. We used this in combo with the magnetic tool to retrieve fallen nuts, bolts, and sockets.
- Small stepladder or a concrete cinderblock on its side. The little extra height makes a world of difference.
- A pair of gloves.
- A couple of small buckets for nuts and bolts.
- Masking tape and a pen. We used this to label hoses and wires.
- A camera to document each step so you can retrace your route if anything goes wrong.
We’re ready to begin. For the photos below, you can click on the picture to get a full-sized image. Good mechanical hygiene is important: keep dirt out of hoses and openings, keep the tools organized, keep track of nuts and bolts, and don’t gouge up the polished mating surfaces between parts. Take pictures so you can use them as reference if something isn’t going back together correctly.
Steps to replacing the Starter
1. Roll the truck into a place easily reached from all sides, set the parking brake, and put chocks under the wheels.
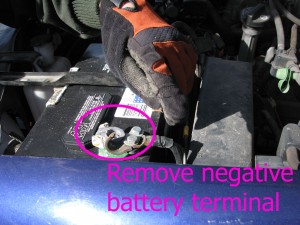
2. Remove the negative battery terminal and tuck it down and away from the battery. From this point on, electricity is NOT your friend.
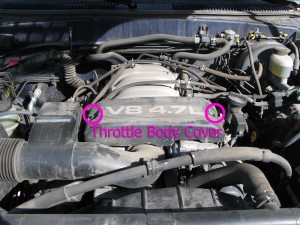
3. Remove Throttle Body cover. There are two nuts holding the cover.
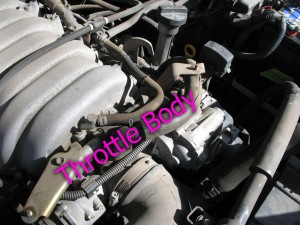
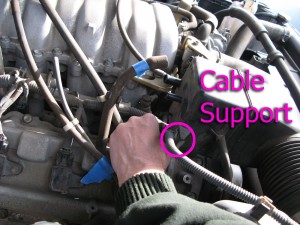
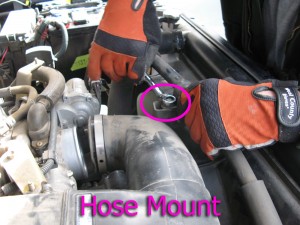
4. Remove and label vacuum lines, cable bundle support, and hose bracket from air intake hose. There are four rubber hoses and a cable bundle connected to the rectangular box on the air intake hose, and a hose mount bracket on the front of the air intake hose. For sanity’s sake, we placed the bolts back into the holes once the brackets were removed.
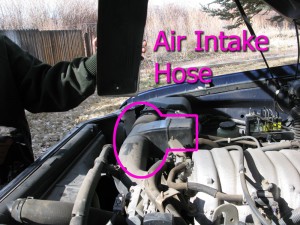
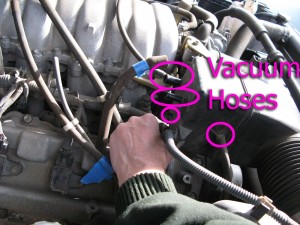
5. Remove air intake hose by loosening the hose clamps at the air intake and the throttle body and wiggling the hose free.
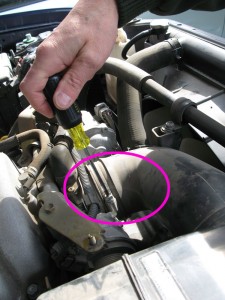
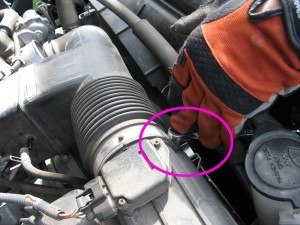
6. Unplug the large connector from the air intake box.
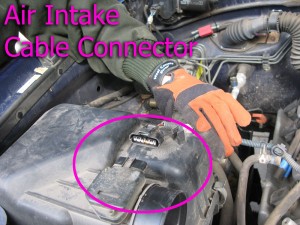
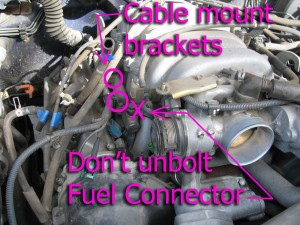
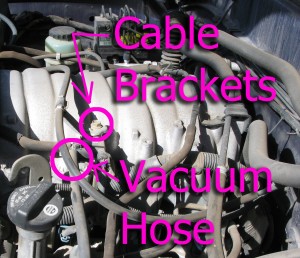
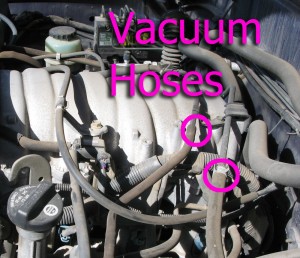
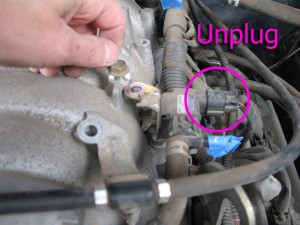
7. Intake Manifold Assembly: Remove and label vacuum lines. Unbolt throttle cable bracket and assorted cable mount brackets. Unplug cable connector from the small black box on the driver’s side of the intake manifold. Make sure that you don’t mistakenly unbolt the fuel rail connectors.
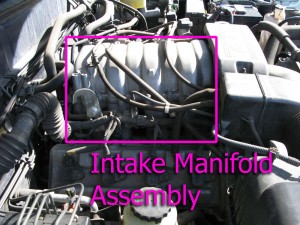
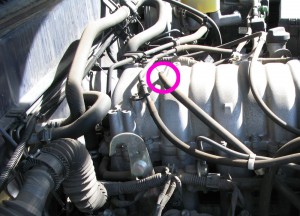
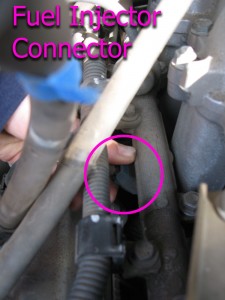
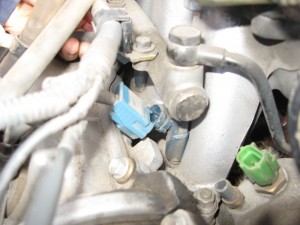
8. Unplug all fuel injectors. There are four, blue fuel injectors with connectors nestled below the fuel rails on either side of the intake manifold assembly. The fuel rails are pipes with a fine, waffle-print pattern on them. The upper part of the blue fuel injectors plug into the fuel rails, and the lower part of the injectors plug into the intake manifold.
There’s a small tab on the underside of the connector. Pinch the tab and the connector between the thumb and fingers and wiggle gently. For us, this was the most difficult part of the entire job, as the connectors were firmly stuck, and some are almost inaccessible beneath the cables and hoses. Note: Be gentle when wiggling the connector free–you may wind up breaking an injector o-ring. Injector o-rings are easy enough to replace once you get the intake manifold out, but it means another trip to the parts desk for a new set of o-rings and another twenty bucks. If you see fuel suddenly pooling around the injector, then you will need to replace all the o-rings on that side. I speak from experience.
9. Unbolt the throttle cable from the front bracket. There are two nuts sandwiching the fingers of the bracket Just loosen the front nut.
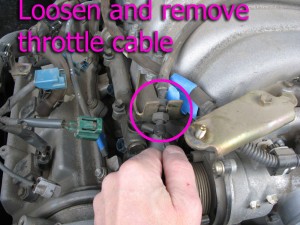
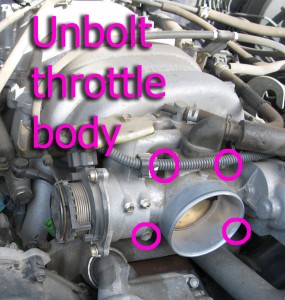
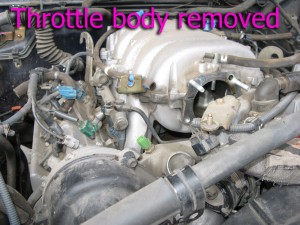
10. Unbolt the Throttle Body. Pull it away from the intake manifold and move it to the side. You don’t have to drain coolant or remove any hoses. Pull the gasket away from the intake manifold. If you’re planning on reusing it, set it aside where you won’t damage it.
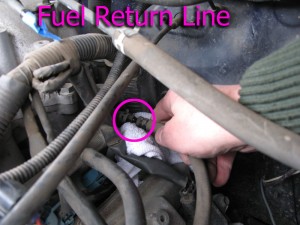
11. Disconnect fuel return line (if equipped) from the intake manifold assembly. The fuel return line is located at the back of the intake manifold assembly, on the driver’s side, below the level of the fuel rail. Wrap a rag around the fuel line joint to absorb any spilled fuel as you disconnect it.
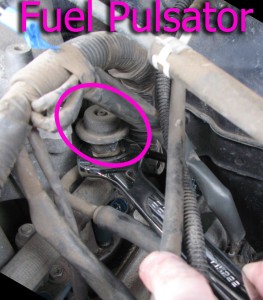
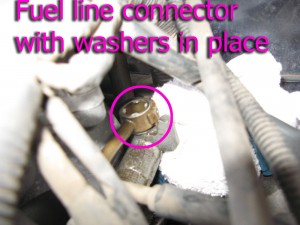
12. Disconnect fuel line. The connection is located at the back end of the fuel rail on the driver’s side. To disconnect the fuel line, use your 22mm wrench to unscrew the “fuel pulsator.” It’s a top-hat-shaped widget, about 1″ diameter, located at the rear of the driver’s side fuel rail. It’s on there pretty snugly. You don’t need to touch the screw on top. Place a rag under it, as it will drip fuel. When you pull out the pulsator, the fuel line and its donut-shaped connector will be free. There are two washers, one above and one below the fuel line connector. Don’t lose these fuel line washers and make sure they go back on in the proper order when you reassemble them. When reassembling, the washer without teeth goes on the bottom, between the fuel rail and the donut-shaped fuel line connector, and the washer with teeth goes on top, between the donut-shaped connector and the pulsator.
13. Remove six 12mm bolts and 4 nuts from intake manifold to cylinder head. The nuts are at the corners of the intake manifold, and the bolts are nestled between the fuel injectors. If you find yourself unbolting something above the level of the fuel rail, you’re in the wrong place. Have the magnetic grabber handy to fish out the bolts and the nuts as you remove them. A 12mm socket on your long extension fits beautifully between the fuel rail and the intake manifold assembly, and there’s even little notches on the fuel rail to make room.
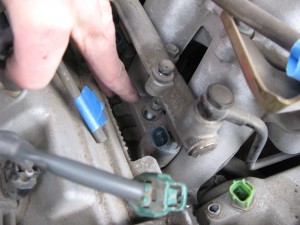
14. Before removing the intake manifold assembly, check to see if there are any stray cable mounting brackets, vacuum hoses, or support brackets still attached to the intake manifold. Trace the hoses/cables to make sure that they really do interfere with removal. Remove and label as necessary.
15. Carefully lift out intake manifold/injector assembly. This is best done with two people. Guide it around the corners, brackets, etc. Set it down in a clean location. You don’t want to get crud in the injector ports on the bottom, and you don’t want to scratch or gouge the polished mating surfaces.
16. You are now looking at the starter nestled in the valley of the engine. In our case, a family of mice had made a nest in the head block. Before removing the gaskets, use a shop-vac to clean up any loose dirt/rust/etc. from around the head openings. Remove the gaskets from the head. Stuff rags into the openings to keep foreign bodies out of the cylinders. If you plan on reusing the gaskets, carefully set them aside.
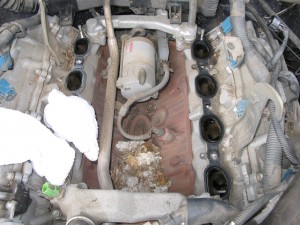
17. Remove 12mm bolt connecting the wire harness to the starter. This bolt is reached from behind the engine. The bolt is hard to get to, as you have to reach your socket wrench between the firewall and the head block. You need to do this by touch, and there is hardly any room to operate the wrench. Again, your magnetic grabber is helpful here to retrieve the bolt as you remove it.
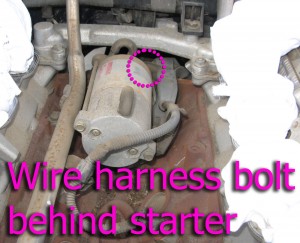
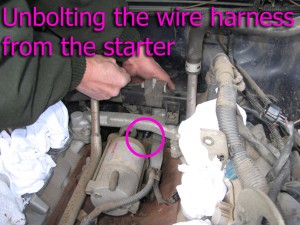
18. Remove the two 14mm bolts holding the starter to the block. Again, you reach these bolts from the back. These are even harder to get to than the bolt in step 17. If you need guidance, take a look at the bolt holes on your new starter to guide you. You’ll need to experiment with extensions and deep vs. regular sockets to get the best results. At least the heads on these bolts are extra long, which makes them easier to get to.
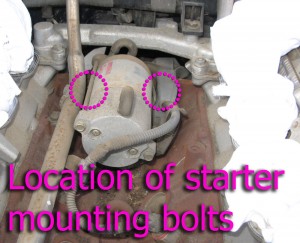
19. Once you’ve unbolted the starter, rotate starter counterclockwise a little bit and unplug the exciter wire and remove 12mm nut holding battery wire to starter. The nut is located under a cap.
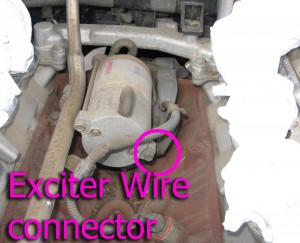
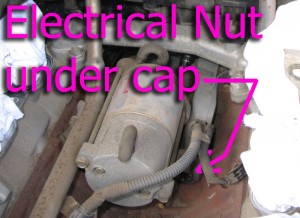
20. Here’s a photo of the new starter in place, showing the electrical connector nut and the socket for the exciter wire.
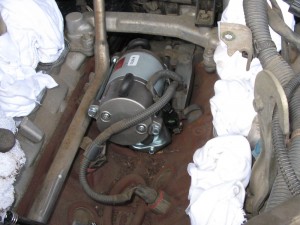
22. Clean the polished mating surfaces on the head block, the intake manifold assembly, and the throttle body. Don’t scratch or gouge. A little gas on a rag should do the trick.
23. It’s time to reassemble everything by following the steps in reverse order to install new starter. If you’re just replacing the solenoid contacts in your old starter, complete that project and then follow the steps in reverse. Don’t break off the little rubber snorkels on the starter; don’t worry if they’re folded over on the new starter. They’ll slowly unfold on their own.
24. When replacing the bolts in the new starter, they should be tightened to a torque setting of 29 foot-pounds. My torque wrench wouldn’t even fit in the tiny space, so I clamped a practice bolt in a shop vise and got the feel of how 29 ft/lbs feels before using the ratchet wrench to tighten the starter bolts.
25. Before replacing the intake manifold assembly, triple-check the head block openings to make sure absolutely nothing fell in there, then install your intake manifold gaskets. Guide the intake manifold into place and lower it onto the bolts at the corners. Again, another person makes this much easier.
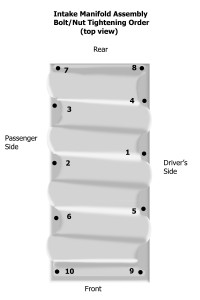
26. When tightening the bolts and nuts on the intake manifold assembly, tighten them to 13 foot-pounds using the torque wrench. Tighten the bolts and nuts in the following pattern, starting with 1, then 2, etc. Start on the driver’s side middle bolt and work in a clockwise circular pattern back and forth across the manifold.
27. After you’ve bolted the intake manifold assembly into place, finish reassembly by reversing the steps. When bolting the Throttle Body back onto the intake manifold, use your torque wrench to tighten the four nuts and bolts to 13 foot-pounds.
Final steps
When you’ve finished, carefully go through the engine and check for any hoses or connectors you may have missed. Check for stray tools or rags. Look for fuel leaks around the fuel injectors and the fuel line connectors. Remedy any problems that you see before starting the vehicle.
Try starting your truck. If everything went as planned, it should start right up and sound normal. Look under the hood and see if any fuel is leaking from around the fuel connectors or fuel injectors.
Troubleshooting
Fuel Injector o-ring replacement: If you managed to tear a fuel injector o-ring, you’ll see fuel leaking from around that location. In most cases, it’s the o-ring that seals the bottom of the injector in the intake manifold. You’ll need to replace all the bottom o-rings on that side of the intake manifold assembly (or top o-rings, if that’s what you broke). To replace the bottom o-rings, order a set of four for each side from the parts desk. While the intake manifold assembly is still out of the vehicle, unbolt the fuel rail and fuel connectors and carefully lift the rail and injectors away from the intake manifold. The tops of the injectors should still be in the fuel rail. Pull out the old o-rings from the holes in the intake manifold and use a Q-Tip to clean out the holes. Apply a very thin amount of plain vaseline to the new o-rings and place them into the holes in the intake manifold. Carefully lower the fuel rail with its dangling fuel injectors back onto the intake manifold, lining up the bottoms of the injectors so that they slip into the o-rings. Reattach the fuel rail. Use the torque wrench to tighten the fuel connector bolt to 29 foot-pounds.
Check Engine Light: If you notice that the “Check Engine” light comes on, then turn off the motor and get back under the hood. Once again, look for any fuel leaks around injectors, and triple-check all the electrical connectors and all the vacuum hoses.
Reset the “Check Engine” light by holding down the odometer button for about 10 seconds while turning the key to “on,” but don’t start the engine. Or, better yet, follow the steps described in your owner’s manual.
Try starting the truck again. The check engine light should remain off. If it comes back on, and you’re absolutely positive you’ve reconnected everything correctly, then something else is going wrong. Misfire, bad sensor…maybe you stepped on a connector while deep in the engine. You may need to have a mechanic hook up a computer to the diagnostic port and discover what’s causing the light to come on.
If you turn the key and the engine doesn’t start, then you’ll need to go online and research the problem further, as it probably wasn’t the starter at fault to begin with.
You’re done!
I hope this has been helpful. If it has, please leave a comment.
Comments
176 responses to “Toyota Tundra starter repair – A journey of discovery”
You Are My Hero. You Saved Me LoTs Of Money And Good Knows I Could Not Have Done It WithOut The Detailed Directions And Pictures! Thanks Again!
This was very informative. I have replaced my 2000 Tundra starter 3 times since 2010 when the original factory starter went out. I bought a replacement starter (a rebuilt one) from Autozone. After taking 2 back in 3 years (I paid for the lifetime warrented part) I decided for an upgraded starter. The original factory starter is made by Denso and the local Autozone gave me the Delco HD starter 2.0khz starter and also Handed me cash back as the 1.4 original replacement starter is MORE money than the HD starter….Strange! My only advice is to buy the original Denso or a Delco starter….Spend the extra $ to find a denso as you only want to do this 1 time. It took me 4 hrs the last time I changed this simple part. Good luck and follow these great instructions
Someguy you are the greatest! your descriptions and pics are the best. what helped me the most was your assurance that your everyday job was something other than a mechanic. It took me 2.5 to get it out and 1.5 to put it back. I can’t believe how much $ you saved me. Thank you!
You are Some Guy, thanks so much for the good instructions. I would have never attempted this without it. I changed the starter on my 2002 tundra in less than 4 hrs. The dealership wanted $750. My total cost was $87.00 and a few skinned knuckles. I used my old gaskets because they appeared to be in good shape. Thanks so much, you should be commended!!
Joe
semper fi
I recently used your tutorial on intake manifold removal to replace my Secondary Air Pump on my 05 Tundra 4.7 Its basically the same, Thank you for the help!!!
I shared a link to this page here:
http://www.tundrasolutions.com/forums/1gen-tundra/270178-gm-secondary-air-pump-replace-tundras/#post2182010
Thanks for the shout out! Nice writeup yourself, BTW.
I have removed all the parts to reach the starter. I have removed the 2 long 14mm bolts that hold the starter in place and the small 12mm bolt that goes into the plastic yellow casing. I have disconnected the ground cable and the blue connector from the starter. But my starter will not come out. I tried hitting with a piece of wood thinking maybe it was glued by the grease and engine gunk and nothing.
Is there a special way of removing the starter once all the bolts are removed? Any help would be greatly appreciated. Thank You.
Is there any play at all? Try jiggling it with a slight side-to-side twisting motion while pulling.
no wiggle room at all or gives no play.
A friend told me that maybe the solenoid might be stuck in the flywheel. Now What?
Once you unbolt the starter, you should be able to rotate it a little bit counterclockwise before removal. The starter bendix could be stuck, leaving the starter meshed with the flywheel. As you know, I’m not a mechanic, so I’d say a second opinion is in order before you attack it with a crowbar. There may be a trick to it that I don’t know.
i don’t see anything else that could be holding the starter in place. Everything is disconnected and all bolts are removed. After jamming a crowbar in between the starter and the piece that it is screwed into, I have managed to get it out about 1/4 of an inch out. But boy, is it ever stuck in there! I just don’t want to break anything by using excessive force. Any thoughts?
Don’t break your truck! Get a second opinion from a skilled mechanic!
Wow. Breaking something is the worry. It shouldn’t take a crowbar to pull off the starter; it should just wiggle loose by hand. You don’t want to damage the flywheel or snap off a part that falls down into the depths. Replacing a broken flywheel is the *last* thing you want to do on this job. If there’s a local shop that you trust, stroll in and ask for an opinion on what to do, or maybe the mechanic at the Toyota dealer can be helpful (our local Toyota dealer…not so much). I’ve found that the old guys at the local auto parts store can be a wealth of knowledge.
i was looking to understand about the intake manifold on my 2003 Tundra,i end up to this terrific how to replace the stater. I was amazed by the clarification on the step by step information. Thank you so much for your time and efforts to put this thing together. Now i believe i have the knowledge to replace the stater in my truck if it needed.
Thanks.
My mechanic gave me a quote $800 yesterday. I did some research and found your article. Decided to do it myself. Thanks to your thorough and descriptive instructions, my truck started right up. Thanks so much! I owe you one man. The most difficult step for me was removing the starter, but I finally got it out.
Add me to the list of satisfied customers. My truck started “clicking” months ago, and today it finally gave up. Took about four hours to do it. I had to remove and replace the manifold by myself, so it can be done. Also, instead of unbolting the throttle cable, it’s much easier to just slide the end out.
this post was great but i need to know what the bar goinging from one side of the block to the other is,i need a gasket for it,its the bar that the starter wire harness gos under,it is leaking water
Tony – Not sure what it’s called. Feel free to print out the picture of the starter that also has the transverse pipe in the picture. Then you can take the photo down to the parts window at the dealer and tell them the VIN number and that you need gaskets for the part in the picture.
Some Guy you are the Man!
My Tundra had the solenoid stuck and engaged turning the motor over even with the keys out . I pulled the Neg battery cable and the truck shut off.
Your instruction’s were Excellent!
Easy to follow and precise .You were right the hardest thing on this Job was removing and reinstalling the starter screw’s .I managed to disassemble and reinstall the starter including replacing all the injector O-rings in 5hr’s. Toyota wanted $1000.00 for the job . I’m glad I found your site the new starter from AutoZone and new washers a gaskets cost me around $260.00 . You saved me over $700.00 bucks
I cannot Thank You Enough Mr. Someguy.
Mikey in Corona ,Ca
Some Guy you are the Man!
My Tundra had the solenoid stuck and engaged turning the motor over even with the keys out . I pulled the Neg battery cable and the truck shut off.
Your instruction’s were Excellent!
Easy to follow and precise .You were right the hardest thing on this Job was removing and reinstalling the starter screw’s .I managed to disassemble and reinstall the starter including replacing all the injector O-rings in 5hr’s. Toyota wanted $1000.00 for the job . I’m glad I found your site the new starter from AutoZone and new washers and gaskets cost me around $260.00 . You saved me over $700.00 bucks
I cannot Thank You Enough Mr. Someguy.
Mikey in Corona ,Ca
Someguy. Just wanted to say thanks, for taking the time to post this excellent page on how to replace the starter. It took me about 7 hours to complete, I ended up accidentally breaking off the plastic cap that covers the positive terminal post on the starter. Other than that, it went pretty smooth.
2006 Toyota Tundra, 167000 miles
Ontario, Canada.
Thanks again, Trevor
I have worked on a vast number of vehicles and absolutely find this to be one of the best instructional posts I have ever seen. My neighbor came over to borrow an extension for his ratchet and got me involved a little bit in helping with his Tundra starter removal I saw he was looking at your post on his laptop. After getting back home I found your page and am amazed at the quality of instructions you presented.
Cheers, Lenchast! We’ll tip back a cold beer tonight in your honor.
I have replaced the starter on my 2000 tundra now my truck idles very low
Also my 2000 tundra won.t start very easy frist thing I have to crank it for awhile before it will start but after it starts in runs fine but idles is low
David – The new starter cranks the engine even if the engine doesn’t fire up, yes? Then the new starter is good. If the engine ran OK before you changed the starter, go back under the hood and look for loose vacuum hoses that didn’t get reconnected–I would call a loose vacuum hose the prime suspect. It happened to us. Also check your electrical connectors, make sure they’re inserted all the way. Is the check engine light on or off?
The check engine light is on because a guy helping pulled the wires out of the connector to the temp sensor. trying to find one no luck so far because it the plug on the wiring harness and nobody sells the plug. could this cause my cold start problem. after it starts it runs fine. thanks
Just wanted to thank you for the Tundra starter replacement page…
I’m not a mechanic but can turn a wrench…. Following the steps on the page I was able to pull off the intake manifold and swap the starter with no problems.
Truck started on the first try… Only issue was a little fuel spraying from the “top hat widget”… Just required a few more turns of tge wrench and it was all good.
My problem with starting is fixed , it was all caused by the temp sensor plug not making connection. I also im having a problem with my push button 4 wheel drive 4 high will kick in when pushed , but 4 low dosen’t work what should I check.
Thanks Someguy, your instructions were flawless!
My 2000 Tundra’s starter was beginning to act up, so 3 1/2 hours and less than $100 later (my brother-in-law owns a NAPA) it’s turning over like a champ. Living in northern Wisconsin I opted for the 2.0 KW starter.
They say you should never buy a vehicle during it’s first year of production but this one has dispelled that theory. With 412,879 miles and counting, the only repairs besides this starter and routine maintenance have been; timing belt & water pump, 2 ignition coils, one set of spark plugs and a new frame thanks to Toyota’s recall.
My Tundra and I thank you!
Thanks very much for putting in the effort to do this. Much more helpful than the Haynes manual. The job went smoothly from start to finish. It really wasn’t as difficult as it originally looked. Most important tool was magnetic pickup tool.
Another vote for a Denso starter, don’t skimp on this. It’s not a job you want to do twice. Local Toyota dealer had rebuilt Denso 2.0KW in stock for $263, only $30 more than Advance Auto Parts, and theirs needed at least 4 days to ship. Cost (after core return) with pair of genuine Toyota intake gaskets and throttle body gasket was $400.
And speaking of the throttle body, be sure to spray the inside of it with carb cleaner upon re-assembly. Also a great time to change air filter if needed.
Amazing work, you should charge for this wealth of information. The starter bolts up against the firewall were tough as you sitting inside your engine compartment. The hardest part I had was taking off the fuel injector clips that took most of my time also. From start to finish(with a cold beer) 4 hours. Saved myself $1,000 minimum. Starter was $99 from autozone with lifetime warranty. The detail was great not. Single skipped step, and the magnetic pen yeah you’ll for sure need that!
Thanks again #itsayotalife
Thank you very much for posting this. It helped me continue the process. I had it all torn down except for the intake. I wasn’t sure how to get the fuel pulsater off. The only thing I did do different was take the coolant line off the rear to unbolt the starter. I have large hands and got tired of fighting the small space. My starter comes in today I will post back and let you know the finale outcome of the project. Thanks for your post.
Thanks guy from Nevada. 79$ and your awesome instructions and we are back on the road. 1200$ from my local Toyota dealer. Oh and a magnet thingy. Thanks for taking the time to do that.
Many thanx. Spent $8 to replace contacts in the starter and the piece that makes contact to start the truck. You know that thing a majiggy. Haha. Thanx again!
Thank you so much for this awesome how to on fixing the starter. I have a 2003 Toyota 4 runner and the starter died. I tried everything- calling autozone for help, looking at Toyota manuals, google, you tube, Toyota sites and NOTHING prepared me for what I was about to endure. I am by no means a mechanic or anything close to one. I used the tools I have (wish I had more!) and was able to complete this repair in 12 hours. I dropped a few tools down the drive shaft and had to slide under the car three times to retrieve them. I spilled a little radiator fluid and some gasoline. I broke a few electrical clips 🙁 I also made a few mistakes- like taking the manifold apart when I didn’t have to (bad advice from another person with an older model) but in the end, I did it and the my truck started up like it was brand new!!! Your guide was amazing. I wish I had found it and used it from the beginning, instead of coming across is through google when I was already 3 hours in and stumped. I loved how I could select your pictures and they would load as a larger image. Your step by step instruction, including labels on your pictures and which size tool I would need was very helpful. I can’t thank you enough for posting this and for keeping it posted so I could find it today! A million thanks!!!!!
Glad you stuck it out, and happy to hear that this guide worked for you. Cheers!
Someguy and missfish, thank you so much for this info. I think I pulled a few muscles doing the project but the sanity stayed intact thanks to you. I bought my 2000 Tundra used and it had a K&N air filter system so a little was different but not much (just take pictures for reassemble.) I did curse the late 1990’s design crew of toyota a few times. But it all worked out just fine. No lights or leaks. First turn of the key. It took about 5 hours to do by myself but I also cleaned the intake manifold inside each pathway. It had some nice build up. Hoping to get a little better mileage and performance. Take Care and God Bless. – Paul
Thanks for visuals and explanations of how to do this what looks like a very challenging job unless one has done a few. I just purchased a used 2005 Tundra SR5 with only 83,000 miles. I was going to do the timing belt but decided to take off the right side (from sitting in the truck) timing cover. It was very easy to remove. I rotated the engine with a wrench and inspected the belt. It didn’t have any signs of “Fraying” or miss alignment and so I decided not to do it at this time. I know Toyota recommends changing at 90,000 or 7 years. Mine is over the years but I’ve read where some have gone over 120,000 to 140,000 miles and still looked not bad. The tensioner bearings and water pump could be a problem, however, if you see the coolant lever going down and don’t see any leaks, could be a head gasket, not common on this engine. Anyways, just thought I would throw in these comments for educational conversation. Thanks for the Starter information. Hopefully, I will not have to do that one for a long time, however, I will bookmark your site for the starter. If you have any comments/photos about changing a timing belt on that engine (4.7) please send them..Sincerely, Ken from Henderson NV. adjacent to Las Vegas NV.
Excellent, excellent instructions, the best that I have found for any mechanical procedure. Things that helped me 1) the detailed photographs, 2) labeling every hose and fitting (made it easy to put the spaghetti back in place), 3) identifying each bolt size.
One thing I learned that might help others is to place pillows and padding in all the locations that your knees and other body parts have to bear weight.
Also, once I had the rebuilt starter in place and hooked up, I took out the fuel pump fuse, hooked up the battery and tested the starter. I did not want to put everything together and then find out that the starter didn’t work. Others may or may not want to do this.
Probably took me 6 hours spread over the 3-day holiday. My truck was parked in the afternoon sun and it was about 90F. I was leisurely and methodical so that I did not make a mistake.
SomeGuy in Nevada, if you are in the SF Bay area you are welcome at my place in Concord.
Gregg
Testing the starter before reassembly is a good idea.
Thanks! Concord is a good place…close enough to the Bay Area, yet far enough away from the Bay Area.
Thank you sir for this thread. This is my first Toyota, while lying under the 03 Tundra changing O2 sensors I said to my self, self where the heck is the starter. Thanks very much for solving that mystery for me. Cheery sir.
2002 toyota sequoia, replacing starter….it it ok to us the electrical connector that attaches to the starter if the clip that locks it in place broke off, or is it best to replace the wires, if so, what is it called?
We did it, thanks to you! We worked on Friday for about 4hrs removing everything. I had already read your post, so I knew it was a big job. My son went to the parts store, while a friend and I tore everything down. Getting the old started out was a lot harder than I thought. We removed the bolts, but the cable connectors were almost impossible to unlock without snapping them. I was forced to super glue two back together. We used two huge flat blade screwdrivers and a mallet to get the old one out. That gray connection box on the right side was too difficult and I ended up cutting away a piece to get the nut off the starter’s power cord.
From that point , my helper who is a young mechanic, did an awesome job following your instructions and reattaching everything. It was great having the ability to go back and read through disassembly again to reattach each vacuum and fuel line. Oh God, that was a lot of work!
My 2001 Toyota Tundra has a new, better starter!
Thanks again,
David
Thanks very helpful, in my case I will not be changing the starter I had a professional do that and lots of money spent, but I now have to replace the knock sensors which they are located in the same spot. This procedure will defenetly help me get the job done and save some money. I thank you again for your knowledge.
Thanks for the Tutorial: What would we do without the internet. Completed this job last night. Took me 4 hours.
Tip: Removing the Blue Fuel Injector connectors: Wedge a small flat head screw driver into the clip for easy removal. They slide right off. (I also had the same rat/mouse problem, How in the world do they find these places?)
This is the second time I have done this. Fortunately the starter I bought is under lifetime warranty. Took it to the shop this time thinking maybe it is something else, “How could it be the starter again, it was only two years ago I replaced it.” I figured I could part with the cash at least for a diagnostic. It was the starter again. When it came down to it, I thought, “I have done this before, I would like to keep $950, for myself, I will do it again.”
Second time it was twice as fast. Got to the starter in about 2 hours this time.
Oh and I to, had a nest in mine the first time. They sure love that spot eh.
Oh… And this tutorial is awesome. I even referenced it again the second time, even though I knew most of it. It is nice to know for sure what socket size, as opposed to guessing and trying to make the second one you tried fit for 10 minutes, before realizing the first on was the right size.
THANKS AGAIN.
Thanks. Great instructions. I owe you a beer. Or two…
Just started it today. Doesn’t seem like to big a job. Gotta get a 22mm wrench for the fuel line and I’ll be ready to pull the manifold (with my wife’s help). Just had the starter replaced 3 years ago by the stealership and it’s already dead. I decided instead of giving them a $1000 i’ll do it myself for under $300. I’m thinking about getting my fuel injectors cleaned while I’m in it
Got the manifold out. Lifted out pretty easily, had my Mrs fish give me a hand. I’m pulling my fuel injectors while I’m in there, 150,000 on them. Local guy cleans them here in Sacramento. Just took the fuel rail off the manifold and pulled the injectors out of the rail. Amazing how the only bolts I have laying around are the ones for the manifold (6 bolts, 4 nuts)everything else I just put back were ever I took it out of. I was wondering that instead of undoing the fuel line and having to mess with the washers, just undo the rubber fuel line attached to the metal part of the fuel line, but while I was at the dealership the parts guy said he wasn’t sure if that was glued in some way and i may not be able to seal it again as well, so i just undid the fuel line. Overall, there isn’t anything I would change in your write-up. It really isn’t that difficult of a job, and it makes us all more confident. Oh I’m gonna clean-out my throttle body while its off, you can never get them clean enough with a rag and a tooth brush. Thanks again Some Guy and Fish woman, you’ve made us all better mechanics
Pulled out one of the wires to the knock sensors by accident. long story short had to buy the whole wiring harness (used) for $200. Was just gonna solder the wire back on to the connector but something else broke inside the connector and when pushed back on the wire/connector pushed back out. Then in taking off the other knock sensor connector the tab broke so the connector wouldn’t stay on.. Im sure I could have taped the heck out of it but who knows how long that would have lasted and maybe vibrated it self loose. So two connectors cost me $200. Undoing them you run the risk of breaking the tab. The point I guess is be extremely careful around those connectors. Glad I pulled my injectors and had them cleaned, guy said they were pretty dirty. Cost me $168 bucks but it beats $1600 for new ones. Cleaned my fuel rails with throttle body cleaner and put it all back together. Started on the second try. Runs much smoother and quieter. And having that magnetic catching tool was a life saver. One of the sockets fell down in the whole were the starter is and wasn’t getting that out without it and I used it to guide the manifold bolts down into there holes.
I just finished repairing a wire to a knock sensor by following your instructions. I cannot thank you enough. It was an easy fix. Without your detailed instructions and photos I don’t believe I would have attempted it.
For those that have a knock sensor wire chewed by a rodent and need a new plug with some wire on it to splice into the existing wire and don’t want to spend a good sum of money on a complete wiring harness that Toyota sells, buy Toyota Part No. 82219-35010. This will give you the plug you need and a few inches of wire. Cut off the other plug that comes with it as it is not needed. This piece cost under $20.
Again…. many thanks.
the instructions were great including the pictures. The comments from everyone who has done this gave me courage to tackle it myself. I have a 2006 Tundra, some changes were made but the process was pretty much the same it’s a little harder working to get the starter out because the manufacture and put throttle right next to the starter. There is also some coolant pipes you need to work around. Thanks Bro.
What an awesome service to mankind! Add my comment to the host of others who have found this exceptional instruction invaluable! All went well except for bumping a wire out of the passenger side knock sensor when removing the starter. Had to pull the lug apart and solder the wire to the connector while laying on a pad on the front of the engine. Other than that, no worries. Thanks for taking the time to put this out! You’re a good man Mr. Someguy!
Thanks so much for your detailed instructions . I had to do my 2000 tundra with 350k in it yesterday. $101.00 for starter from Napa. Reuse gaskets. Took about 4.5 hrs for mine .I removed hood 1 st thing to make easier.I have fair to good experience working on engines being a country boy from Alabama. Thanks again. Your write up saved me probably 2-3 hrs and 450.00.
The starter on my 2001 Tundra V8 just went out at 169k miles. The garage called me and quoted $800 to replace with an OEM starter. I read over the warnings in the first part of your instructions. I’m now 66 yrs old and don’t have the patience nor the desire to tackle this like I once did when I was younger. I’ll bite the bullet and pay for someone else to do it.
However, my hat’s off to you, sir! What an impressive set of detailed instructions. Thanks for the time and energy you channeled into documenting and sharing this step-by-step list with accompanying pics. You made it alot easier for the do-it-yourselfer who wants to dive into this project. Great job!!
Thanks a ton, job was slick and easy thanks to the picks. Ran a bit rough at first and check engine light came on. I had to hold the gas in to keep at an idle, only for a minute. The next day, I drove it about 5 miles. Engine light went off and it runs like a champ. Not sure what it was. The VSC lights came on too. Maybe rebuilding fuel pressure as I felt it was a good idea to release pressure by taking of the gas cap. A job well done thanks to this post!
Thanks much Some Guy; your work here makes this ludicrous process somewhat more bearable. I’ve replaced a couple starters on a tractor, 99 4Runner, and 85 Ford F350 before – which has always been a very simple job, not even a distant cousin to this mess. Couldn’t stand to fork out a grand for the whole job, but I ended up having the original starter serviced (plunger, contacts and test) for about $50 – the sum total of my bill for this project. No broken or leaking o-rings on my project and did not replace any of the gaskets, which all appeared to be fine. Took me right around 4 hours labor, bruised palm (but no knuckles) and 3 glasses of reasonably good bourbon to finish the task. Now off to celebrate with some better bourbon, now that the job is done and I can fully enjoy. Best to you and thanks again.
Thanks for the info and excellant tips. My 2000 cranked right up and made me proud. 279,000 milles safe and sound. It was a pleasure to reboot the truck that has taken such good care of me. Thank-you and Missfish!
Someguy. Like many of the people in this thread I googled how to replace a Tundra starter due to the fact that I couldn’t find it! That is the last place I would have expected it to be. I am a lineman by trade and mechanically inclined so to not be able to even locate the starter when I was broke down was down right maddening. Im located in the Bay Area like Gregg and the dealerships want close to 400.00 for the new one and 1200.00 more for the labor. Crazy talk.! Thanks for your awesome, detailed instructions. Thanks to your time and effort to post this Santa was able to make it to my house!!