Last week, I jumped into our 2000 Toyota Tundra pickup truck to go to an appointment, and instead of the usual surefire start, all I heard was a single “chunk” from under the hood. After some troubleshooting steps, I realized that the starter solenoid had gone out, so I thought, “sure…a starter is really easy. Crawl under the truck, a couple of bolts, attach the wire and that’s it.”
Wrong.
The Toyota Tundra, with the 4.7 liter engine, demurely wears its starter buried deep beneath the intake manifold, like some sort of Victorian corset. In other words, the starter is basically inside the engine. Normally, I would not write about something as mundane as engine repair on an otherwise light-hearted travel blog, but I realized that there may be others out there with the same problem who could benefit from a how-to from a non-mechanic’s viewpoint. I know enough about engines to know the general theory of how they work, where to pour the oil, etc. Fortunately, I’m also pretty fearless when it comes to general mechanical and structural work. Given the proper instructions and tools, I believe I can tackle almost anything.
Initially, Miss Fish and I decided to save the hassle and have a pro do the work. The dealer wanted almost $1000 to replace the starter, and the local independent shop quoted $1500. That shock sealed the deal for us; we opted to do it ourselves. Keep in mind that the last time I went into an engine, it was to adjust the carburetor, replace the points, change a manifold gasket, clean spark plugs, and adjust the timing. In other words, it was a long time ago in a bygone era, back when fuel injectors were some sort of esoteric thing seen only in fancy cars with unpronounceable, Italian names.
Let’s get started.
This how-to is written for the 4.7 liter Toyota engine, also known as the 2UZ-FE engine. If this isn’t the engine in your Toyota, then I assume you’re only reading this for pleasure–in which case, you’re a strange duck and we like the cut of your jib.
Assumptions:
- You’re not a professional mechanic or someone skilled with auto repair. If you are, then this how-to will only insult your intelligence.
- However, you need to have some level of familiarity with what’s under the hood. If you don’t even know how to change your oil, then this isn’t the job for you to be doing.
- You’ve definitively diagnosed (or have had diagnosed) the problem as the starter and/or starter solenoid and not a starter relay or a dying battery, or any of the other myriad reasons why a vehicle won’t start.
- You have a rudimentary knowledge of tool usage. If I say “Torque Wrench,” you should not feel nervous or sweaty.
- You have no problems saying “I’m stuck” and asking a more-knowledgeable person for help if necessary. If you’re lucky, you have a mechanically-inclined friend who’d be willing to help you out for an afternoon.
- You’re not a concert soloist or a surgeon. You will get scraped knuckles from this.
- You understand that this is a record of my experience only, and is not an official guide. You already know that we’re imbeciles under the hood. If you’re using my notes as a definitive guide, then you’ve been warned.
- By undertaking this project yourself, you run the risk of rendering your vehicle unusable. You run the risk of setting your vehicle on fire. You run the risk of over/under-tightening bolts and breaking very expensive parts. You run the risk of bodily injury to yourself. And, there’s a whole universe of other things that can go wrong.
- At some point, you will be climbing into your engine compartment. Be careful where you sit, and watch where you set your hands/feet/butt. It’s easy to break something, snap off a connector or sensor, or bend a tube. Get some padding to rest your knees/butt on. The edges get uncomfortable.
- The same model of engine can have small differences from year to year, so your own situation may vary.
- Keep in mind that Miss Fish did about 50% of the work on her own, and she has zero mechanical aptitude. It is possible to do this job.
Before-the-job steps:
1. Know what you’re getting into and understand that you’ll be spending several hours being intimate with the guts of your truck. Visit the various bulletin board sites for helpful information from people who know what they’re doing. The problem is that if you don’t know what you’re doing, like Miss Fish and me, then you’ll waste a good deal of time wondering what a “throttle body” is. I found the most helpful information in a long thread on tundrasolutions.com and some pictures in another thread at YotaTech. Read through and get a feel for what’s involved. The folks at the parts desk at your local dealer also may be a good resource. At least the guys at our local dealer were.
2. Sign up for a two-day membership ($15) at techinfo.toyota.com, also known as “TIS”. This will give you access to lots of diagrams, and general steps to disassembly and assembly. Search the library tree for the information on the 2UZ-FE engine. Ignore the other engine model(s). You’re looking for information on “Engine” and “Starter.” Download, save, and print out the PDF files. I found the component schematics and torque specifications most helpful.
3. Order your parts. You’ll need to spend a little money to fix your truck. Order your parts from a dealer or a reputable source, and use “Denso”-brand parts. Those are the parts already in your truck.
Starter: There are two different starters available for your engine, and either one will fit. The “normal” starter is the 1.4 kilowatt model. That’s what I had in my truck. There’s also a 2.0 kilowatt starter, which is more powerful and beneficial if you live in a cold area. You can either replace the entire starter ($260) or just attempt a replacement of the solenoid contacts inside the starter ($20).
I opted to upgrade my whole 1.4 kilowatt starter with the 2.0 kilowatt model. If you decide to only replace the contacts, you’ll need to research further information on contact replacement elsewhere, such as tundrasolutions.com. Keep in mind that replacing the solenoid contacts may not solve your starter problem if the problem is not the contacts. It would be a major pain in the neck to reassemble your engine only to find that your truck still doesn’t start.
Gaskets: You have an option here just to reuse the gaskets you already have in the engine or get new ones. I opted for new gaskets. Now that I’ve been into the engine, I realize that reusing the existing gaskets is a reasonable decision.
Final shopping list:
– 2.0 kilowatt Starter ($260, plus $30 deposit)
– Intake manifold gaskets x 2 (one for each side) ($30 each)
– Throttle body gasket ($27)
If you order parts from your local dealer, have your VIN number ready. They’ll know exactly what specific part numbers you’ll need based on the VIN. You can locate the VIN number on the inside of the driver’s side door pillar.
When you pick up the parts, save your receipt so you can get the $30 deposit refunded when you return the old starter. Return the old starter inside the same box in which you got the new one.
4. Tools you’ll need This is a list of every single tool we used. Everything is metric on the Tundra.
- Box wrenches: 8mm, 10mm, 12mm, 14mm, 22mm
- Adjustable wrench
- 3/8″ ratchet handle
- Standard-depth sockets: 10mm, 12mm,14mm
- Deep sockets: 12mm, 14mm
- 3/8″ socket extensions: 3″, 6″, and 12″
- Torque wrench, capable of between 13 ft/lbs and 29 ft/lbs. The folks at the local auto parts store should be able to help you learn how to use one if you don’t know how.
- Needle-nosed pliers. Squeezing hose clamps and general holding-on-to-things.
- Large and small flat-blade screwdrivers. We gently–that’s gently–used these for the connector catches that refused to budge with finger pressure alone.
- #2 Philips-head screwdriver. Used to remove the hose clamps on the air intake.
- A Shop-Vac. You’ll use this to suck up crud from around the openings in the cylinder head.
- A bag of rags. You’ll need at least 10 or more clean rags to sop up gas from disconnected fuel lines and plugging up the openings in the cylinder head to keep piston-destroying trash out of your engine.
- Very important: a telescoping, magnetic retrieval tool. You will need this. Trust me.
- Flexible, lighted grabber tool. We used this in combo with the magnetic tool to retrieve fallen nuts, bolts, and sockets.
- Small stepladder or a concrete cinderblock on its side. The little extra height makes a world of difference.
- A pair of gloves.
- A couple of small buckets for nuts and bolts.
- Masking tape and a pen. We used this to label hoses and wires.
- A camera to document each step so you can retrace your route if anything goes wrong.
We’re ready to begin. For the photos below, you can click on the picture to get a full-sized image. Good mechanical hygiene is important: keep dirt out of hoses and openings, keep the tools organized, keep track of nuts and bolts, and don’t gouge up the polished mating surfaces between parts. Take pictures so you can use them as reference if something isn’t going back together correctly.
Steps to replacing the Starter
1. Roll the truck into a place easily reached from all sides, set the parking brake, and put chocks under the wheels.
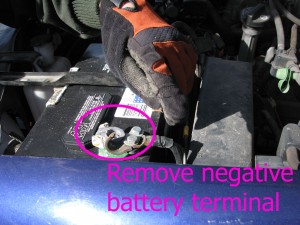
2. Remove the negative battery terminal and tuck it down and away from the battery. From this point on, electricity is NOT your friend.
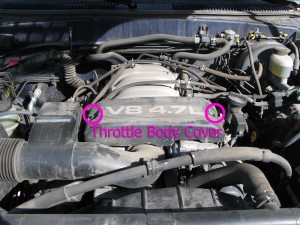
3. Remove Throttle Body cover. There are two nuts holding the cover.
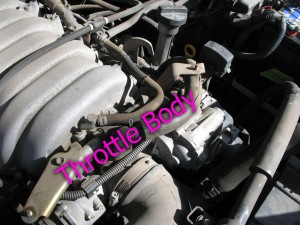
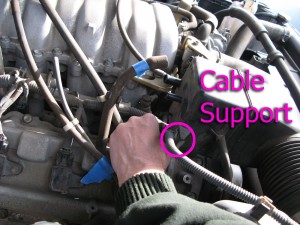
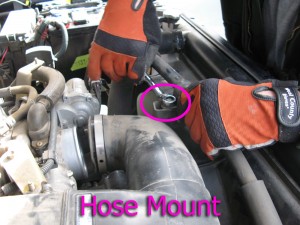
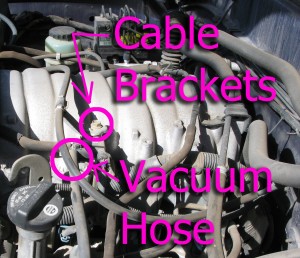
4. Remove and label vacuum lines, cable bundle support, and hose bracket from air intake hose. There are four rubber hoses and a cable bundle connected to the rectangular box on the air intake hose, and a hose mount bracket on the front of the air intake hose. For sanity’s sake, we placed the bolts back into the holes once the brackets were removed.
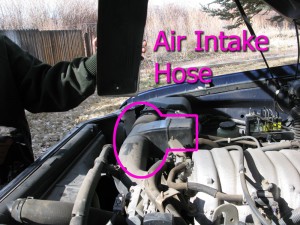
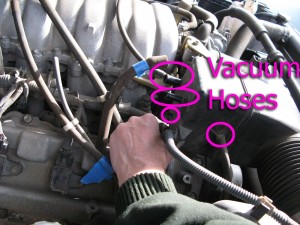
5. Remove air intake hose by loosening the hose clamps at the air intake and the throttle body and wiggling the hose free.
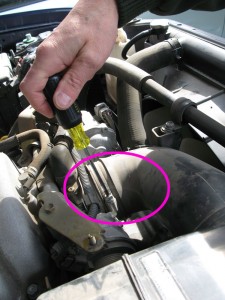
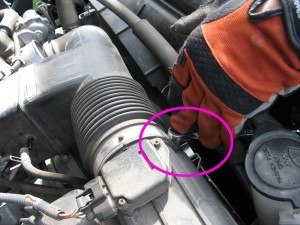
6. Unplug the large connector from the air intake box.
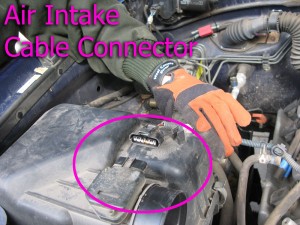
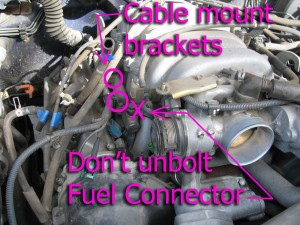
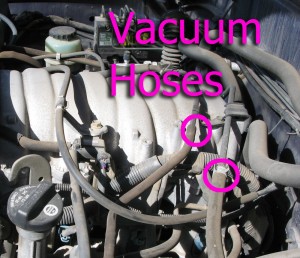
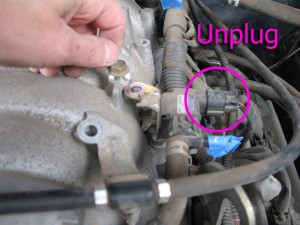
7. Intake Manifold Assembly: Remove and label vacuum lines. Unbolt throttle cable bracket and assorted cable mount brackets. Unplug cable connector from the small black box on the driver’s side of the intake manifold. Make sure that you don’t mistakenly unbolt the fuel rail connectors.
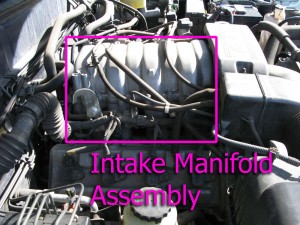
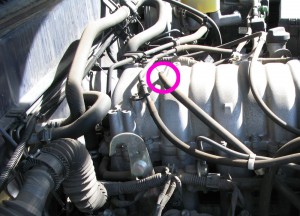
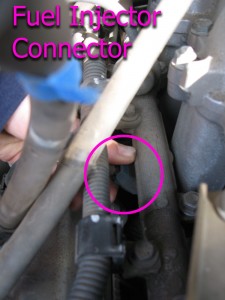
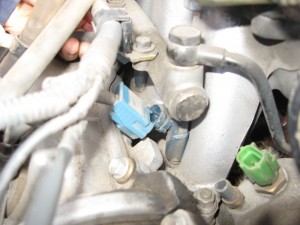
8. Unplug all fuel injectors. There are four, blue fuel injectors with connectors nestled below the fuel rails on either side of the intake manifold assembly. The fuel rails are pipes with a fine, waffle-print pattern on them. The upper part of the blue fuel injectors plug into the fuel rails, and the lower part of the injectors plug into the intake manifold.
There’s a small tab on the underside of the connector. Pinch the tab and the connector between the thumb and fingers and wiggle gently. For us, this was the most difficult part of the entire job, as the connectors were firmly stuck, and some are almost inaccessible beneath the cables and hoses. Note: Be gentle when wiggling the connector free–you may wind up breaking an injector o-ring. Injector o-rings are easy enough to replace once you get the intake manifold out, but it means another trip to the parts desk for a new set of o-rings and another twenty bucks. If you see fuel suddenly pooling around the injector, then you will need to replace all the o-rings on that side. I speak from experience.
9. Unbolt the throttle cable from the front bracket. There are two nuts sandwiching the fingers of the bracket Just loosen the front nut.
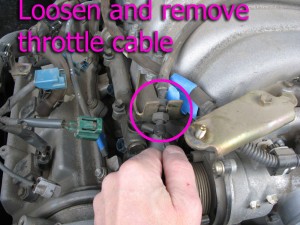
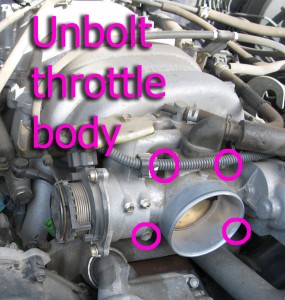
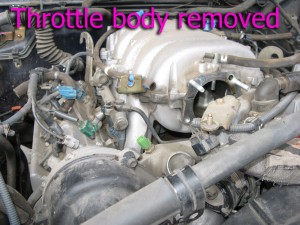
10. Unbolt the Throttle Body. Pull it away from the intake manifold and move it to the side. You don’t have to drain coolant or remove any hoses. Pull the gasket away from the intake manifold. If you’re planning on reusing it, set it aside where you won’t damage it.
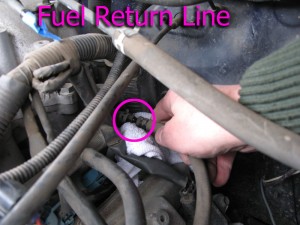
11. Disconnect fuel return line (if equipped) from the intake manifold assembly. The fuel return line is located at the back of the intake manifold assembly, on the driver’s side, below the level of the fuel rail. Wrap a rag around the fuel line joint to absorb any spilled fuel as you disconnect it.
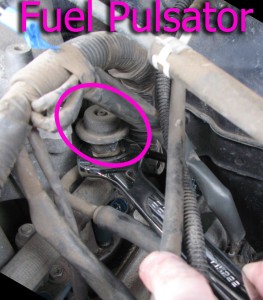
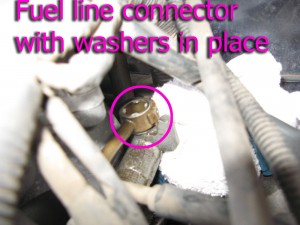
12. Disconnect fuel line. The connection is located at the back end of the fuel rail on the driver’s side. To disconnect the fuel line, use your 22mm wrench to unscrew the “fuel pulsator.” It’s a top-hat-shaped widget, about 1″ diameter, located at the rear of the driver’s side fuel rail. It’s on there pretty snugly. You don’t need to touch the screw on top. Place a rag under it, as it will drip fuel. When you pull out the pulsator, the fuel line and its donut-shaped connector will be free. There are two washers, one above and one below the fuel line connector. Don’t lose these fuel line washers and make sure they go back on in the proper order when you reassemble them. When reassembling, the washer without teeth goes on the bottom, between the fuel rail and the donut-shaped fuel line connector, and the washer with teeth goes on top, between the donut-shaped connector and the pulsator.
13. Remove six 12mm bolts and 4 nuts from intake manifold to cylinder head. The nuts are at the corners of the intake manifold, and the bolts are nestled between the fuel injectors. If you find yourself unbolting something above the level of the fuel rail, you’re in the wrong place. Have the magnetic grabber handy to fish out the bolts and the nuts as you remove them. A 12mm socket on your long extension fits beautifully between the fuel rail and the intake manifold assembly, and there’s even little notches on the fuel rail to make room.
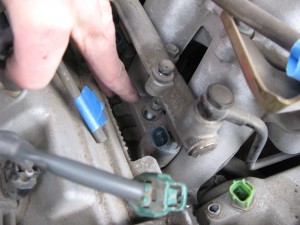
14. Before removing the intake manifold assembly, check to see if there are any stray cable mounting brackets, vacuum hoses, or support brackets still attached to the intake manifold. Trace the hoses/cables to make sure that they really do interfere with removal. Remove and label as necessary.
15. Carefully lift out intake manifold/injector assembly. This is best done with two people. Guide it around the corners, brackets, etc. Set it down in a clean location. You don’t want to get crud in the injector ports on the bottom, and you don’t want to scratch or gouge the polished mating surfaces.
16. You are now looking at the starter nestled in the valley of the engine. In our case, a family of mice had made a nest in the head block. Before removing the gaskets, use a shop-vac to clean up any loose dirt/rust/etc. from around the head openings. Remove the gaskets from the head. Stuff rags into the openings to keep foreign bodies out of the cylinders. If you plan on reusing the gaskets, carefully set them aside.
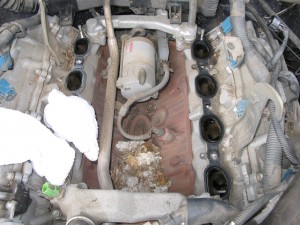
17. Remove 12mm bolt connecting the wire harness to the starter. This bolt is reached from behind the engine. The bolt is hard to get to, as you have to reach your socket wrench between the firewall and the head block. You need to do this by touch, and there is hardly any room to operate the wrench. Again, your magnetic grabber is helpful here to retrieve the bolt as you remove it.
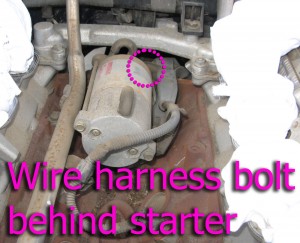
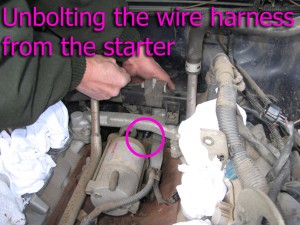
18. Remove the two 14mm bolts holding the starter to the block. Again, you reach these bolts from the back. These are even harder to get to than the bolt in step 17. If you need guidance, take a look at the bolt holes on your new starter to guide you. You’ll need to experiment with extensions and deep vs. regular sockets to get the best results. At least the heads on these bolts are extra long, which makes them easier to get to.
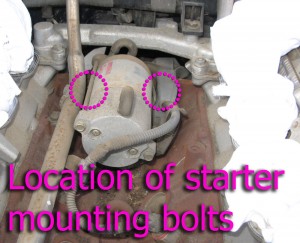
19. Once you’ve unbolted the starter, rotate starter counterclockwise a little bit and unplug the exciter wire and remove 12mm nut holding battery wire to starter. The nut is located under a cap.
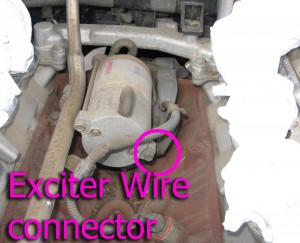
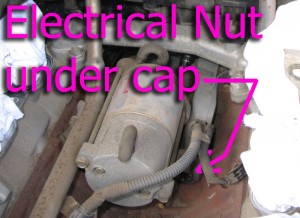
20. Here’s a photo of the new starter in place, showing the electrical connector nut and the socket for the exciter wire.
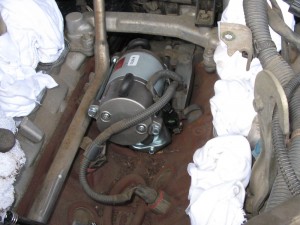
22. Clean the polished mating surfaces on the head block, the intake manifold assembly, and the throttle body. Don’t scratch or gouge. A little gas on a rag should do the trick.
23. It’s time to reassemble everything by following the steps in reverse order to install new starter. If you’re just replacing the solenoid contacts in your old starter, complete that project and then follow the steps in reverse. Don’t break off the little rubber snorkels on the starter; don’t worry if they’re folded over on the new starter. They’ll slowly unfold on their own.
24. When replacing the bolts in the new starter, they should be tightened to a torque setting of 29 foot-pounds. My torque wrench wouldn’t even fit in the tiny space, so I clamped a practice bolt in a shop vise and got the feel of how 29 ft/lbs feels before using the ratchet wrench to tighten the starter bolts.
25. Before replacing the intake manifold assembly, triple-check the head block openings to make sure absolutely nothing fell in there, then install your intake manifold gaskets. Guide the intake manifold into place and lower it onto the bolts at the corners. Again, another person makes this much easier.
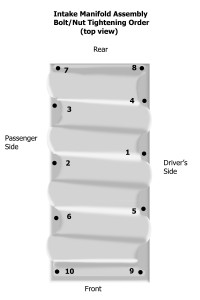
26. When tightening the bolts and nuts on the intake manifold assembly, tighten them to 13 foot-pounds using the torque wrench. Tighten the bolts and nuts in the following pattern, starting with 1, then 2, etc. Start on the driver’s side middle bolt and work in a clockwise circular pattern back and forth across the manifold.
27. After you’ve bolted the intake manifold assembly into place, finish reassembly by reversing the steps. When bolting the Throttle Body back onto the intake manifold, use your torque wrench to tighten the four nuts and bolts to 13 foot-pounds.
Final steps
When you’ve finished, carefully go through the engine and check for any hoses or connectors you may have missed. Check for stray tools or rags. Look for fuel leaks around the fuel injectors and the fuel line connectors. Remedy any problems that you see before starting the vehicle.
Try starting your truck. If everything went as planned, it should start right up and sound normal. Look under the hood and see if any fuel is leaking from around the fuel connectors or fuel injectors.
Troubleshooting
Fuel Injector o-ring replacement: If you managed to tear a fuel injector o-ring, you’ll see fuel leaking from around that location. In most cases, it’s the o-ring that seals the bottom of the injector in the intake manifold. You’ll need to replace all the bottom o-rings on that side of the intake manifold assembly (or top o-rings, if that’s what you broke). To replace the bottom o-rings, order a set of four for each side from the parts desk. While the intake manifold assembly is still out of the vehicle, unbolt the fuel rail and fuel connectors and carefully lift the rail and injectors away from the intake manifold. The tops of the injectors should still be in the fuel rail. Pull out the old o-rings from the holes in the intake manifold and use a Q-Tip to clean out the holes. Apply a very thin amount of plain vaseline to the new o-rings and place them into the holes in the intake manifold. Carefully lower the fuel rail with its dangling fuel injectors back onto the intake manifold, lining up the bottoms of the injectors so that they slip into the o-rings. Reattach the fuel rail. Use the torque wrench to tighten the fuel connector bolt to 29 foot-pounds.
Check Engine Light: If you notice that the “Check Engine” light comes on, then turn off the motor and get back under the hood. Once again, look for any fuel leaks around injectors, and triple-check all the electrical connectors and all the vacuum hoses.
Reset the “Check Engine” light by holding down the odometer button for about 10 seconds while turning the key to “on,” but don’t start the engine. Or, better yet, follow the steps described in your owner’s manual.
Try starting the truck again. The check engine light should remain off. If it comes back on, and you’re absolutely positive you’ve reconnected everything correctly, then something else is going wrong. Misfire, bad sensor…maybe you stepped on a connector while deep in the engine. You may need to have a mechanic hook up a computer to the diagnostic port and discover what’s causing the light to come on.
If you turn the key and the engine doesn’t start, then you’ll need to go online and research the problem further, as it probably wasn’t the starter at fault to begin with.
You’re done!
I hope this has been helpful. If it has, please leave a comment.
Comments
176 responses to “Toyota Tundra starter repair – A journey of discovery”
As 1st assistant to Mr Someguy, I learned that “Yes we can” tear apart and rebuild our engine is not only possible, but almost enjoyable. Of course, the trip to Toyota to buy replacement “O” rings was due to my clumsy and inexperienced removal technique, but I still managed to maintain my status as 1st (and only) assistant.
GRUNT GRUNT
Someguy. You are a genius. The starter on my 2003 crapped out last night. I have a daunting project ahead of me, but this page will give me all I need to get the job done. Thanks a bunch.
Glad we could point the way. Let us know how it goes!
I had estimates from $500 to $800 to fix or replace the starter with a rebuilt one (4 – 5 hours labor). We’re not mechanics (but somewhat mechanically inclined), and using your page as our guide my son and I pulled the starter and had it repaired and back running again in 2 1/2 hours and $69.
We sincerely thank you. Your page with pictures and descriptions was the perfect guide.
Glad it helped! It’s interesting that the quotes for your repair were 50% less than the quotes we got.
WOW!! What more can I say.. other than THANK YOU!!!!! Our starter is definately going out..very nervous..but we dont have the money to have it done at the dealer or a shop. Your instructions are fabulous! I Pray that we get it right and fix it..
Thanks again!!
Good luck! We’ll be rootin’ for ya! Let us know how it goes.
I’m going to tackle this on my 2000 tundra in a couple days….I’m not a mechanic by any stretch, but after reading your post and looking at the pics I think I can do this. I will let you know how it goes!
Good luck! We’d like to hear how it went.
Great Job of documenting this entire process!! The Internet is such and awesome tool especially with people such as yourselves, that take the time and effort to document projects. It makes it so easy for the regular Joe Blow.
I just now finished taking the starter out. I was really struggling with Chilton manual. What a piece of crap!
I don’t usually go online and post but you guys deserve it! Thank you very much!
Efrain
Thanks, Efrain. We found that the internet was much better than the Chilton as well. Hope the repair goes smoothly for you!
I did it. I followed every one of your instructions and I pulled it off! Took me about 6 hrs. The hardest part of the job was getting the old starter off and the new one back on. Man, those bolts are hard to get too and tight.
Thanks again for posting this. I told a female friend what I was about to do and told her I got it off a website called “some guy in Nevada” and she just rolled her eyes. Well, thank you Some Guy In Nevada!
Hey Travis…You’re welcome! I’m glad it worked for you. It’s definitely an adrenaline boost when you turn the key and the truck starts right up.
My dear friends, you should get paid for this, the detail, the pics, the step by step instructions, mechanics must hate you. damm good job, thanks a mil.
Actually, our mechanic was impressed and gave us a pat on the back. We bring her enough work that we’re not putting her out of business anytime soon.
Well Thank You Nevada Guy. I have been a tow truck driver for 18 years now and today I had to crawl under a tundra to troubleshoot a no crank problem. I searched for 30 minutes and thought I was loosing my mind. Where the heck was the starter. Luckily simply rocking the truck back and forth disengaged the stuck starter and off the customer went. Ofcourse with my advise that she consult her local mechanic of choice.
Thanks again for assuring me that I had not been doing this job for to long.
Glad we could preserve on-the-job sanity. The apparent lack of a starter drove me nuts at first. I thought that it had fallen off somewhere.
This was fantastic and I agree with the others that you have helped – these were absolutely perfect instructions. Thanks so much! I took about two weeks of limited evenings to do it and your pictures and text were on the money. The starter bolts about killed me since I’m a big boy but I did it by feel like you said and it worked out. I did some price comparisons I would like to pass on to others. The Toyota starter was $252 but I got one from Auto Zone for $72 that is guaranteed for life. For some reason the smaller one with less oomph was $130 so I got the larger for 1/2 the price(the $72 one). They looked exactly the same and the Auto Zone guys did not know why this was so. They said to just go with the cheaper one. Got the intake manifold gaskets from Toyota for $50 because AZ and Pep Boys were upper and lower as a kit and were $70. I just needed the lower of course. I also got the fuel pulsator washers from Toyota for $2 each. I did get the throttle body gasket from AZ for $20 and it’s a perfect match. So mixing and matching I did the entire job w/ all new gaskets for $157 which beats $1500 at dealership. Thanks Someguy!
Thanks for the price tips! The one O’Reilly’s in our town had to special order the starter, and the price was suspiciously similar to Toyota’s, so I bet that they were just going to resell one that they bought from the dealership.
Yeah, those starter bolts are a killer. I bet that there’s a special technique or tool hidden away somewhere, but I didn’t find it. If anyone has a nifty trick to get a torque wrench to work in that tiny little space, let us know!
wow lots of people having starter problems. i am going to atemp this install next week. im ordering all the parts online.
Good luck, Guy in TN! It’s time consuming but pretty easy once it’s all done…and a lot cheaper.
Finished putting a new starter last night. Used you instructions and it went off without a hitch! Hardest part is getting the starter off (hands are not happy!). Thanks again!
Glad it worked for you! Yeah, I’m not sure how the pros get their hands behind the engine to reach the starter bolts easily. Maybe they use child labor.
thanks for the pictures
Well I am half way done…got new starter on. Waiting on gaskets in mail tomorrow to finish putting back together. I had downloaded repair manual from Toyota and between it and your posting all made pretty good sense. I definitely had problems getting old starter off… laying on stomach holding my head on top of firewall for support, all different angles. My neck will be sore tomorrow. But got it off and new one on. Had to go buy a deep well 14 MM socket I didn’t have. And like you said both bolts on starter required a little different approach. Went back on a little easier. Thanks.
Great job, I am going to pay the $900 that Toyota wants to do it. I have found local shops at 750 but would rather go toyotas trail. Now I envy you that you did this and cataloged all that you did. This kind if stuff that they did with the stater makes me want to sell my 2007 Tundra 5.7 liter and buy a 1969 something with a six that I can work on. My toyota has been great 132250 miles and this is the first thing to go. Buy why in the center of the engine…… residual radiation from heroshima and nagasaqi and no I could not spell them if my starter depended on it. And for those researching this is the best info I have found.
Russell
Finshed two weeks ago. With new redtop batterie, everything was good started up good, went with a remanufactor starter, now regretting. This morning started -n ran fine but this afternoon same thing happened. A clicking no start. At first i thought it was the relay. Nope. I got new connections to batterie. Could it be my remaufactor starter. I’m bout to burn this truck n walk away
Don’t set it on fire! Then you’d have no truck, a scorched driveway, *and* you’d have to come up with something to tell the fire marshall!
Dang. It sure sounds like they sold you a bum starter. Time to raise some hell. If there’s a “click”, then I bet that the relay is good. Maybe it’s the starter solenoid itself?
i have remove intake manifold in my toy tundra 2008 , due to change knock sensor(small thing on pasenger side on your pic)but removing procedure is same!
YOUR INSTRUCTION IS THE BEST!!!! ON ENTIRE POSTS ON INTERNET( i read about 100,mabe more)
THAN YOU!!!
Thanks. This how-to was a result of not finding anything comprehensive on the web. I’m honored that it helped.
havnt had time to take the starter out yet. but yes i do get a clicking when i turn the key, now my batterie is dead. left alone for weeks, its a new redtop batt. i so dread doing this now. only days off i hav is sundays and every sunday rains, no garage, so im outside in the cold.
Raise some hell and get your money back for that refurb starter. There will be a sunny Sunday sometime soon. Advantage: you’ve already done the job, so it should go faster and easier the second time.
Finally fixed !!!! yea i knocked out the starter in two hours install. easier the second time around. i ran into another problem, when i left my truck sitting for a long time my new batt died. turn out that my ground on the batt terminal was bad. i went with a denso remanufactor starter and it start like when we first got the truck. dont ever buy bosch or the worldwide start (products) stick with denso and trd parts. pay more for the right stuff, dont be like me and go cheap and waste more time and money, in the long run it cheap will get you shi*
Excellent, Tennessee! Glad you didn’t set the truck on fire after all.
I am having problems with my 2000 Tundra starting. But I don’t hear a click when I try to start it. So Im not sure it is my starter. By the way my truck has 236,000 miles on it and it is the first starter it came with so I am thinking it is the starter. What do yall think?
Without the telltale ‘click’ from the relay, I’d suspect something else…maybe the relay itself? Outside of a bad battery, I sure don’t have an easy answer. The ground wire from the battery to the block/chassis may be bad (happened to me once). If not then, start with the connection from the battery to the ignition switch to the neutral safety switch to the starter relay. It’s gonna take some poking around. Heck, with all the computerized components, maybe there’s something unrelated to the starter that’s preventing the truck from starting. You got a mechanic friend who can check diagnostic codes?
Someguy…..Thank you for the detailed instructions! They worked fabulously. Three years ago, I had this starter problem first occur. After spending $1,200 at the dealership, I thought it was taken care of for a long time. Wrong. Not wanting to be out another $1,200, I decided to take it on myself. Your instructions were much more clear than anything else I found. After only getting 3 years out of a “new” starter from the dealership, I decided to go with a rebuild on the existing starter. Other than the contacts and plunger, all other parts were in excellent shape. I took the starter in to a starter/alternator shop where they did the work for me. Incidentally, when they took the starer apart, I noticed the plunger was not the same as the new replacement I had. The starter guy pointed out to me that the plunger in the starter (purchased from the dealership) was aftermarket, not OEM. The new parts I had were OEM. The plunger that was in there had very thin copper, thus the short life. Based on this experience, I would be inclined to recommend a rebuild of the existing starter, to make sure the internals are done with OEM parts.
Hah! With that flimsy plunger, it sure sounds like the dealer’s plan was to have you come crawling back for another $1200 thrashing. I find it really hard to believe that the tech who replaced the plunger didn’t notice that it was the wrong one. That sort of suspicious and shady behavior from our dealer is what got me under the hood of my own truck. I would have gone the same route of solenoid plunger/contact replacement if I already had the 2.0 KW starter.
After screwing us over another unrelated problem, our dealer up here even demanded that we give them a five star review with Toyota HQ. I’m going to go pour myself a beer and drink to defying dirty dealership practices.
Very informative….Very professional!
Well my friend, your instructions were amazing! A total of about 4 1/2 hours, replaced contacts and a $60 set of gaskets and my truck is running like nothing ever happened. I couldn’t of saved $600+ without you. Thanks so much!
Thanks for the help!! I was able to do the repair in only 3 hours by myself. Saved $1000!!
Just took the manifold off tonight and had a bear of a time getting it out. ended up having to bend back by force the hoist hooks. Thanks for the post. This is just what I needed. The posts on yotatech and tundra solutions were good, however, lacked the detailed steps you have provided here.
On another note, is there anything else I should/could take care of while I have this manifold off? I just thought I would do everything I can since it took me a while to get to this point. Thanks again.
Well, the starter is the big thing, of course. There’s the gaskets, but if the old ones are in good shape then you can reuse them. Perhaps replace the injector o-rings? There’s not too much to tinker on without pulling off the headers, but I don’t think you even want to go there. Just make sure that everything inside the intakes is clean and without debris before reassembling the manifold.
Mr. Someguy,
Could not believe it when I found out that the starter on my 2006 Tundra 4.7 was under the intake manifold. Unlike the other obvoius B.O. starter failure symptoms, my starter will start without fail when the vehicle/engine is cold. However, when it’s driven for a while and tuned off (engine hot). Nothing. Not a click. Nothing. Nada! Plenty of jucie from a new DIE HARD. After a few additional attemtps, or the engine cools off a little. It starts right up. Not sure if it’s the starter or not. Maybe a loose conection at the starter? Any thought?
You’ve crossed over into the realm of infinite possibilities.
Have someone turn the key when you’re listening under the hood. Can you hear any relay click? If so, then it might be something loose in the starter solenoid, since it’s right there getting hot from sitting in the engine.
Do the dash panel lights come on when you turn the key to ignition? If not, then it could be a faulty ignition switch.
I’d still investigate the starter or the starter relay, because they’re under the hood where they can get hot.
Keep in mind that I’m just pulling this out of my you-know-what, so don’t take it as gospel. It may be time for a visit to a sympathetic mechanic who can tell you what’s likely to be broken, then you can fix it yourself.
This was (will be) very helpful had my starter replaced a few months ago and the guy was and is a sleezy… Still owe my dad for it. Was scared to do it myself until you inspired the more daring side of me. Let you know how it goes.
Thanks! Someguy. My Son and I got through this with only one problem. We accidently pulled the wire out of one of the knock sensor connectors on the top of the block. I should have disconnected them prior to R&R of the starter. I thought we were in big trouble. However, we were able to take the factory connector apart, strip the wire and solder it to the terminal and gently reassemble. A dental tool and patience was the trick. Thanks for the pics and tips!
Wow, what a great write up! I have an 04 and am about to tackle a P0330 knock sensor circuit malfunction. Looks like it will be an identical tear down to get to these troublesome sensors. any advice on a P0330? Email me!
Someguy,Just wanted to say thanks for the info on how to replace the starter on my 2001 Tundra. I just had my local mechinican replaced the ignition switch about a month ago. Now in the process of replacing starter. I well with the $71.00 high torque starter from O-Rileys. Truck has 182,000 miles on it. Hopefully after replacing starter I won’t have no more mechinical breakdowns for awhile. Thanks Again
Just read Scoop’s question about his truck starting when cold but not when it is hot. My Dad’s truck (GMC) had the same problem a few years ago and it turned out that the Bendix gear was staying engaged after starting. This caused the starter bearings to heat up and sieze. The truck wouldn’t start until the starter had cooled off. Best bet is to have it rebuilt or as a last resort, get a new one. By the way, your info for getting to the starter is a lifesaver. I am helping my neighbor solve his intermittent starting problems. (2000 Tundra V-8)
Great instructions. However. When i screwed the fuel rail on, I cross threaded it. it cought on fire from the fuel running down the top of the block to the starter. Now the other problem. I have a “sucking sound coming from somewher (i think it’s the plastic peace that the metal gasket sits in) not sure. Any thoughts or answers.
Ouch. Fire is not a good outcome. Hopefully you got it put out before too much damage. The sucking sound: I bet that sucking = vacuum leak somewhere. There’s still a hose disconnected somewhere, or there’s something leaking at the intake. Use a cheap stethoscope with the head cut off and move the tube around until you definitely locate the source of the sound.
Can’t thank you enough for the step by step instructions and key advice. I was able to replace the starter by myself (6+ hours). The only problem I encountered was that my truck was miss-firing after it started on the first try. I replaced the plugs and did some trouble shooting with the help of AZ. The diagnostics pointed to #1 cylinder (miss-firing). Turned out to be the connector to the Fuel Injector was not properly plugged in. Should’ve checked EVERY connection like you recommended! THANKS AGAIN!
My next job is to replace the radiator… Seems so much easier after tackling the starter.
Man, I gotta tell you. You are a LIFESAVER! I live in Southern Baja, Mexico…where the mechanics fix one problem and make 2 more for you. So I was a little hesitant to take it to a mechanic. (Toyota dealership quoted me over 2000 pesos-a little over $150-to do the work here) But after seeing your work, I thought I could tackle it. So after ordering a remanufactured Denso from dealership in the states and some new gaskets, I am up and running again! Took almost 7 hours including an oil change. But I wasn’t in a rush. Plus, had others “issues” happening during the day. So I was very happy with the outcome. And it wasn’t the second bolt on the starter that gave me trouble, it was the nut holding the wire harness! Crazy, right?!? I just used a deep socket on both starter bolts and they came out just fine. But that wire harness bolt fought with me taking it out and putting it back. I was a little worried with the dirt that fell into the valve chamber (Baja=dirt). Tried to vacuum as much as I could. But the valve chamber was d-i-r-t-y. Lots of carbon build up. Don’t know how to deal with that yet. Just happy to be running again. Thanks a million!
Very clear instructions. Found it after following the Hayes manual and getting stuck. They have you remove the injectors and throttle body completely. 5 hours following their instructions, and the intake wasn’t off yet. About an hour after reading your instructions, intake was off, new starter was in, now I’m waiting on o-rings. Thanks for taking the effort to document this.
Thank you for this fantastic write up!!!!
It will definately save me some cash doing it myself not to mention enjoyment it brings me wrenching on my ride, and not to let any mechanic touch my steel 🙂
Thanks again
God Bless!!!
Just want to add another thanks to the list. Me and my friend did it it about 4 1/2 hrs thanks to your how to. The magnet definitely came in handy, except for when the pulsator washer fell under the battery box…though it did confirm that the washer is stainless steel. Only word of caution is to not tighten the bolt for the wiring harness on the passenger side fuel rail too tight, it will break off. Thanks again.
Chris in Hidden Valley Lake, CA
Like the many other comments and praise left here for you, someguy, I am thankful for the time and effort you went through to post all the information and pictures for this God forsaken procedure to replace a tundra starter. I was inquiring some time ago about the price of a tundra starter(mine had intermittent clicking) and the location of it because I couldn’t see it anywhere while I’m underneath the truck,and another worker over heard the conversation and mentioned “it’s inside the engine”. Well I really didn’t think I’ll be doing this, I just hope it last a little longer. Well, a little longer quickly became the here and now! Stopped in Winco Foods for a maximum of 10 minutes,got back in the truck…click! Tried by passing the security system because it had worked before, but not this time(more on the security system shortly) just clicked.Tried several times, but ended up walking 5 miles home with my computer under my arm.
Had to have it towed for the first time since I bought it new in 2000.It has about 320,000 on it with no major problems. Ordered the new starter the next day along with new gaskets,and I must say I was a bit worried about the undertaking. But as I got into it I just followed your directions. You had it layed out with pictures step by step… I had it completed before dark and boy was I glad to have it done. I also double and triple checked hoses,electrical,connections,as you suggested…all seemed complete.
So I get in turn the key …nothing!
No click…nothing! Tried again…not even a small click! I was bummed!…what did I forget to connect?…..then it came to me!! It dawned on me because I’ve had some issues with the security system, that it has to be it…and I know how to by pass it. Looked at my son who had helped me all day with this and I said “you watch, the truck thinks it’s being stolen and won’t start,so I’ll by pass the security system and it will start”… IT DID! Fired right up! Glad it’s done! Thanks again someguy! This really helped and saved me a bunch to get this done!
Roger D. in Ca.
Glad it worked for you, Roger! I must admit, one of my most satisfying days with my truck was when I went under the hood and tore out the wiring for the security system.
First off Thanks for all the info. This article helped a lot. My son and I tackled the job over the weekend. Took me much longer about 9 hours.
The story
When my original starter went out in 2008 I had a well know Japanese auto shop replace the starter for 900.00.Then in Feb this year the starter started the click BS no engage again. After replacing the battery Starter relay I knew the starter was the issue after less than five years. The second 2.kw starter was a rebuilt Denso from the dealer. The dealer does not sell new starters for a 2002 Tundra.
So I bought a new 2.kw one from AZ I did not want to go with another Rebuilt Denso after reading the do not uses quality parts when rebuilding the starters (contacts and plunger) I can’t find much about these new starters from AZ hopefully it will last longer.
Tips
when removing the fuel injector connectors I used a pair of long nose locking pliers. Insert a small flat tip screw driver in the tab of the connector lock the pliers on the top flat part of the connector the pull gently.
I just finished replacing the starter contacts on my 1999 Toyota Land Cruiser using this guide. Thank you.
A couple of tips:
I had to use a ratchet knuckle on the driver’s side starter bolt. What a pain.
I laid a few boards across the hood to hold myself over the engine so I could reach the starter bolts.
I used the “Victory Lap ND-36SOL Solenoid Repair Kit” to replace the contacts in my starter. It was $14 on Amazon.
It took me about 6 hours to finish.
Also, I took the starter to Autozone after I replaced the contacts so that they could test it.
I really wanted to make sure it worked before I put everything back together.
It’s been a few years since you posted this, but it is still the best and only visual aid for this project. You have just saved me 1,000 bucks and I really appreciate it! It ended up taking me 6 hours, but really wasn’t to bad in the long run. If i wasn’t timid at first and taken a lot of precautions it could have gone quicker. Toyota should give you a job putting up blogs and videos on how to master there stupid ass engineering. These cars run great, but they still would even if the starter took two bolts to replace. Anyways, you are very much appreciated and thanks for taking the extra time to take all those pictures and write out all the steps to make our lives a bit cheaper!
This job went well thanks to you! I did come up with a way to save your back on this job. I put padding on the fenders, then placed a 2×10 across the engine compartment. Much easier to lay on the 2×10 when working on the back of the engine. I also used 8 inch concrete blocks to stand on. Thank you!
I have had to take off the intake manifold twice now and the first time I followed your instructions most of the way. (I didnt all the way so I learn a little more on my own.) ANYWAY, The trick I found for the starter mounting bolts was taking a deep socket 14mm to break it loose. To retighten I got the bolts set and hand tighten as much as possible then that deep socket fits right it.
To Help Visualize: (As you look at the starter from the front of the vehicle) for the left side feed your wrench from the left. Feed from behind and under the starter and you should get a decent ratchet range of motion because of the space the deep socket creates. For the right mounting bolt its a little more tricky. Feed the wrench from right. behind and under again BUT after you get it in the area feed the bottom of your wrench up behind the wiring harness. (the one currently doing a GREAT JOB at blocking your view) you again get a decent range of motion and should be able to get your torques down.
NOTE: my hands are kind of on the medium to small in size so if you can feed the bottom end of your wrench up GREAT! If you can’t you should still get some motion from the initial bottom and behind feed just not as much and more things in your way to bend, break or other.
Hope that helps.
Tony– Thanks for the tip. That’s pretty much what we wound up doing. Toyota gives a torque spec for those starter bolts, but they made it about impossible to get a torque wrench in there.
Someguy. May you win a huge jackpot and if not, may the president of Toyota lose his yearly bonus which he just cashed and may you find it.( but being the great person that you are, you would probably return it) This world is sure a better place with people like you and Miss Fish.
Thank you.
I could sure use that bonus!
Very helpful advice and pictures, you’re right the caps on the injectors are buggers to get off. everything went smoothly. Thanks lot for the info.
Extremely helpful. thank you for your descriptive narrative. if it wasn’t for you I would not have attempted this job. got it done and it took about 3 hours. 1 of the hours was just to get started. thanks you.
I followed your steps and it worked perfectly. A great bonding opportunity with my son. He now knows how to use a torque wrench.
Thank you for sharing your knowledge.
New starter not in yet, but old one coming out. Saved lots of $$$$$$$$$$$$$$$. Thanks for the tips and your time!!!!!