Last week, I jumped into our 2000 Toyota Tundra pickup truck to go to an appointment, and instead of the usual surefire start, all I heard was a single “chunk” from under the hood. After some troubleshooting steps, I realized that the starter solenoid had gone out, so I thought, “sure…a starter is really easy. Crawl under the truck, a couple of bolts, attach the wire and that’s it.”
Wrong.
The Toyota Tundra, with the 4.7 liter engine, demurely wears its starter buried deep beneath the intake manifold, like some sort of Victorian corset. In other words, the starter is basically inside the engine. Normally, I would not write about something as mundane as engine repair on an otherwise light-hearted travel blog, but I realized that there may be others out there with the same problem who could benefit from a how-to from a non-mechanic’s viewpoint. I know enough about engines to know the general theory of how they work, where to pour the oil, etc. Fortunately, I’m also pretty fearless when it comes to general mechanical and structural work. Given the proper instructions and tools, I believe I can tackle almost anything.
Initially, Miss Fish and I decided to save the hassle and have a pro do the work. The dealer wanted almost $1000 to replace the starter, and the local independent shop quoted $1500. That shock sealed the deal for us; we opted to do it ourselves. Keep in mind that the last time I went into an engine, it was to adjust the carburetor, replace the points, change a manifold gasket, clean spark plugs, and adjust the timing. In other words, it was a long time ago in a bygone era, back when fuel injectors were some sort of esoteric thing seen only in fancy cars with unpronounceable, Italian names.
Let’s get started.
This how-to is written for the 4.7 liter Toyota engine, also known as the 2UZ-FE engine. If this isn’t the engine in your Toyota, then I assume you’re only reading this for pleasure–in which case, you’re a strange duck and we like the cut of your jib.
Assumptions:
- You’re not a professional mechanic or someone skilled with auto repair. If you are, then this how-to will only insult your intelligence.
- However, you need to have some level of familiarity with what’s under the hood. If you don’t even know how to change your oil, then this isn’t the job for you to be doing.
- You’ve definitively diagnosed (or have had diagnosed) the problem as the starter and/or starter solenoid and not a starter relay or a dying battery, or any of the other myriad reasons why a vehicle won’t start.
- You have a rudimentary knowledge of tool usage. If I say “Torque Wrench,” you should not feel nervous or sweaty.
- You have no problems saying “I’m stuck” and asking a more-knowledgeable person for help if necessary. If you’re lucky, you have a mechanically-inclined friend who’d be willing to help you out for an afternoon.
- You’re not a concert soloist or a surgeon. You will get scraped knuckles from this.
- You understand that this is a record of my experience only, and is not an official guide. You already know that we’re imbeciles under the hood. If you’re using my notes as a definitive guide, then you’ve been warned.
- By undertaking this project yourself, you run the risk of rendering your vehicle unusable. You run the risk of setting your vehicle on fire. You run the risk of over/under-tightening bolts and breaking very expensive parts. You run the risk of bodily injury to yourself. And, there’s a whole universe of other things that can go wrong.
- At some point, you will be climbing into your engine compartment. Be careful where you sit, and watch where you set your hands/feet/butt. It’s easy to break something, snap off a connector or sensor, or bend a tube. Get some padding to rest your knees/butt on. The edges get uncomfortable.
- The same model of engine can have small differences from year to year, so your own situation may vary.
- Keep in mind that Miss Fish did about 50% of the work on her own, and she has zero mechanical aptitude. It is possible to do this job.
Before-the-job steps:
1. Know what you’re getting into and understand that you’ll be spending several hours being intimate with the guts of your truck. Visit the various bulletin board sites for helpful information from people who know what they’re doing. The problem is that if you don’t know what you’re doing, like Miss Fish and me, then you’ll waste a good deal of time wondering what a “throttle body” is. I found the most helpful information in a long thread on tundrasolutions.com and some pictures in another thread at YotaTech. Read through and get a feel for what’s involved. The folks at the parts desk at your local dealer also may be a good resource. At least the guys at our local dealer were.
2. Sign up for a two-day membership ($15) at techinfo.toyota.com, also known as “TIS”. This will give you access to lots of diagrams, and general steps to disassembly and assembly. Search the library tree for the information on the 2UZ-FE engine. Ignore the other engine model(s). You’re looking for information on “Engine” and “Starter.” Download, save, and print out the PDF files. I found the component schematics and torque specifications most helpful.
3. Order your parts. You’ll need to spend a little money to fix your truck. Order your parts from a dealer or a reputable source, and use “Denso”-brand parts. Those are the parts already in your truck.
Starter: There are two different starters available for your engine, and either one will fit. The “normal” starter is the 1.4 kilowatt model. That’s what I had in my truck. There’s also a 2.0 kilowatt starter, which is more powerful and beneficial if you live in a cold area. You can either replace the entire starter ($260) or just attempt a replacement of the solenoid contacts inside the starter ($20).
I opted to upgrade my whole 1.4 kilowatt starter with the 2.0 kilowatt model. If you decide to only replace the contacts, you’ll need to research further information on contact replacement elsewhere, such as tundrasolutions.com. Keep in mind that replacing the solenoid contacts may not solve your starter problem if the problem is not the contacts. It would be a major pain in the neck to reassemble your engine only to find that your truck still doesn’t start.
Gaskets: You have an option here just to reuse the gaskets you already have in the engine or get new ones. I opted for new gaskets. Now that I’ve been into the engine, I realize that reusing the existing gaskets is a reasonable decision.
Final shopping list:
– 2.0 kilowatt Starter ($260, plus $30 deposit)
– Intake manifold gaskets x 2 (one for each side) ($30 each)
– Throttle body gasket ($27)
If you order parts from your local dealer, have your VIN number ready. They’ll know exactly what specific part numbers you’ll need based on the VIN. You can locate the VIN number on the inside of the driver’s side door pillar.
When you pick up the parts, save your receipt so you can get the $30 deposit refunded when you return the old starter. Return the old starter inside the same box in which you got the new one.
4. Tools you’ll need This is a list of every single tool we used. Everything is metric on the Tundra.
- Box wrenches: 8mm, 10mm, 12mm, 14mm, 22mm
- Adjustable wrench
- 3/8″ ratchet handle
- Standard-depth sockets: 10mm, 12mm,14mm
- Deep sockets: 12mm, 14mm
- 3/8″ socket extensions: 3″, 6″, and 12″
- Torque wrench, capable of between 13 ft/lbs and 29 ft/lbs. The folks at the local auto parts store should be able to help you learn how to use one if you don’t know how.
- Needle-nosed pliers. Squeezing hose clamps and general holding-on-to-things.
- Large and small flat-blade screwdrivers. We gently–that’s gently–used these for the connector catches that refused to budge with finger pressure alone.
- #2 Philips-head screwdriver. Used to remove the hose clamps on the air intake.
- A Shop-Vac. You’ll use this to suck up crud from around the openings in the cylinder head.
- A bag of rags. You’ll need at least 10 or more clean rags to sop up gas from disconnected fuel lines and plugging up the openings in the cylinder head to keep piston-destroying trash out of your engine.
- Very important: a telescoping, magnetic retrieval tool. You will need this. Trust me.
- Flexible, lighted grabber tool. We used this in combo with the magnetic tool to retrieve fallen nuts, bolts, and sockets.
- Small stepladder or a concrete cinderblock on its side. The little extra height makes a world of difference.
- A pair of gloves.
- A couple of small buckets for nuts and bolts.
- Masking tape and a pen. We used this to label hoses and wires.
- A camera to document each step so you can retrace your route if anything goes wrong.
We’re ready to begin. For the photos below, you can click on the picture to get a full-sized image. Good mechanical hygiene is important: keep dirt out of hoses and openings, keep the tools organized, keep track of nuts and bolts, and don’t gouge up the polished mating surfaces between parts. Take pictures so you can use them as reference if something isn’t going back together correctly.
Steps to replacing the Starter
1. Roll the truck into a place easily reached from all sides, set the parking brake, and put chocks under the wheels.
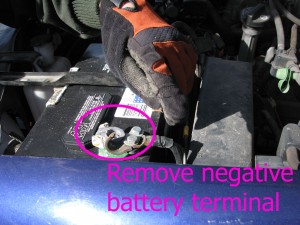
2. Remove the negative battery terminal and tuck it down and away from the battery. From this point on, electricity is NOT your friend.
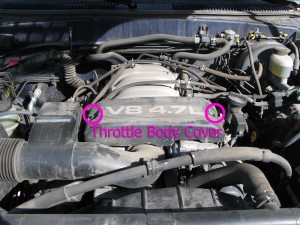
3. Remove Throttle Body cover. There are two nuts holding the cover.
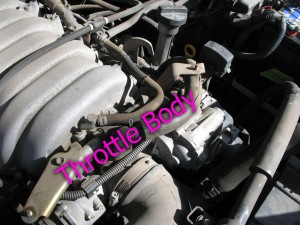
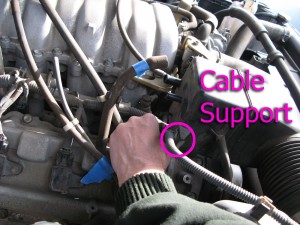
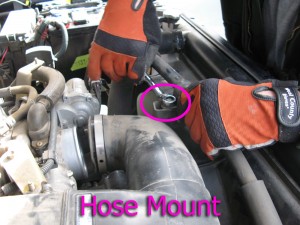
4. Remove and label vacuum lines, cable bundle support, and hose bracket from air intake hose. There are four rubber hoses and a cable bundle connected to the rectangular box on the air intake hose, and a hose mount bracket on the front of the air intake hose. For sanity’s sake, we placed the bolts back into the holes once the brackets were removed.
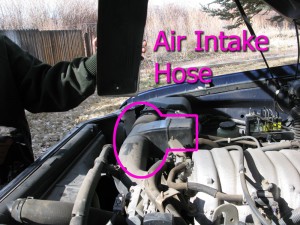
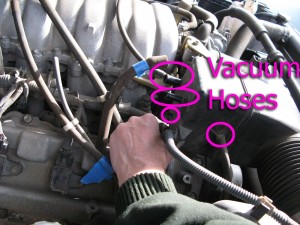
5. Remove air intake hose by loosening the hose clamps at the air intake and the throttle body and wiggling the hose free.
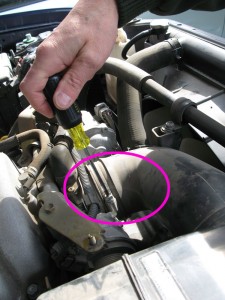
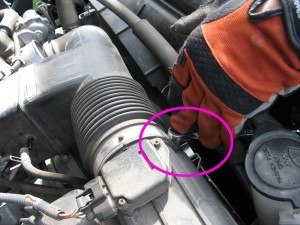
6. Unplug the large connector from the air intake box.
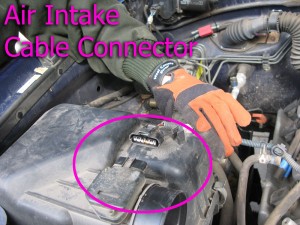
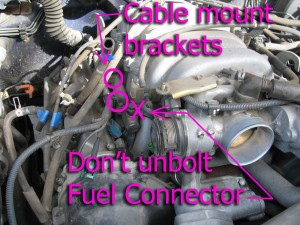
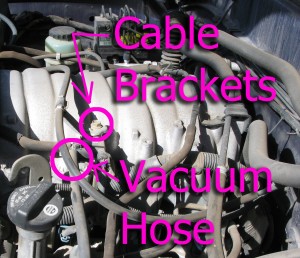
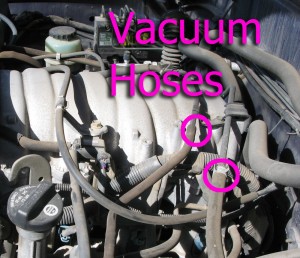
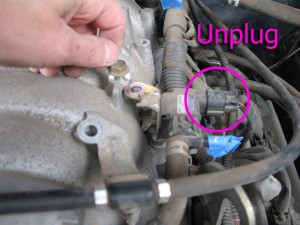
7. Intake Manifold Assembly: Remove and label vacuum lines. Unbolt throttle cable bracket and assorted cable mount brackets. Unplug cable connector from the small black box on the driver’s side of the intake manifold. Make sure that you don’t mistakenly unbolt the fuel rail connectors.
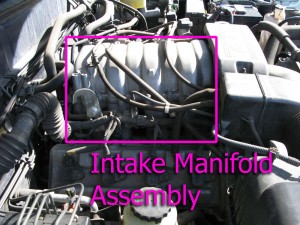
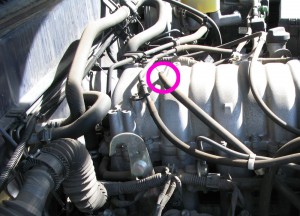
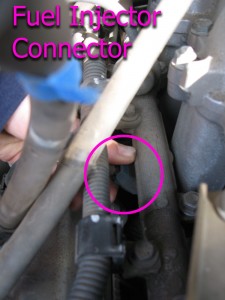
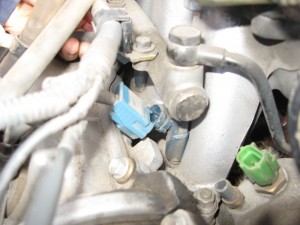
8. Unplug all fuel injectors. There are four, blue fuel injectors with connectors nestled below the fuel rails on either side of the intake manifold assembly. The fuel rails are pipes with a fine, waffle-print pattern on them. The upper part of the blue fuel injectors plug into the fuel rails, and the lower part of the injectors plug into the intake manifold.
There’s a small tab on the underside of the connector. Pinch the tab and the connector between the thumb and fingers and wiggle gently. For us, this was the most difficult part of the entire job, as the connectors were firmly stuck, and some are almost inaccessible beneath the cables and hoses. Note: Be gentle when wiggling the connector free–you may wind up breaking an injector o-ring. Injector o-rings are easy enough to replace once you get the intake manifold out, but it means another trip to the parts desk for a new set of o-rings and another twenty bucks. If you see fuel suddenly pooling around the injector, then you will need to replace all the o-rings on that side. I speak from experience.
9. Unbolt the throttle cable from the front bracket. There are two nuts sandwiching the fingers of the bracket Just loosen the front nut.
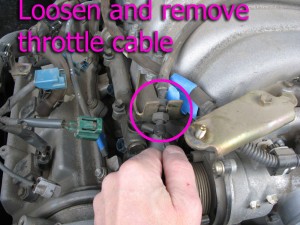
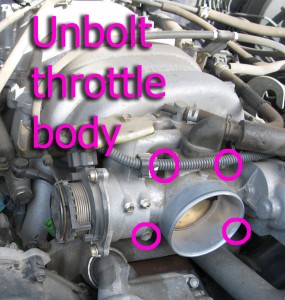
10. Unbolt the Throttle Body. Pull it away from the intake manifold and move it to the side. You don’t have to drain coolant or remove any hoses. Pull the gasket away from the intake manifold. If you’re planning on reusing it, set it aside where you won’t damage it.
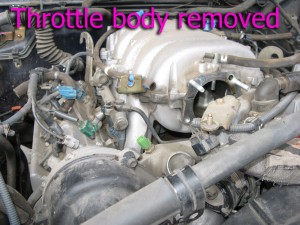
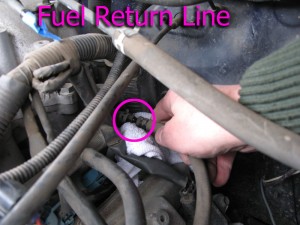
11. Disconnect fuel return line (if equipped) from the intake manifold assembly. The fuel return line is located at the back of the intake manifold assembly, on the driver’s side, below the level of the fuel rail. Wrap a rag around the fuel line joint to absorb any spilled fuel as you disconnect it.
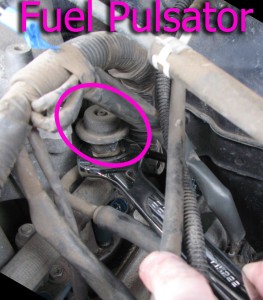
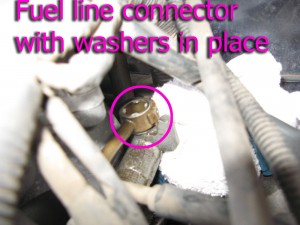
12. Disconnect fuel line. The connection is located at the back end of the fuel rail on the driver’s side. To disconnect the fuel line, use your 22mm wrench to unscrew the “fuel pulsator.” It’s a top-hat-shaped widget, about 1″ diameter, located at the rear of the driver’s side fuel rail. It’s on there pretty snugly. You don’t need to touch the screw on top. Place a rag under it, as it will drip fuel. When you pull out the pulsator, the fuel line and its donut-shaped connector will be free. There are two washers, one above and one below the fuel line connector. Don’t lose these fuel line washers and make sure they go back on in the proper order when you reassemble them. When reassembling, the washer without teeth goes on the bottom, between the fuel rail and the donut-shaped fuel line connector, and the washer with teeth goes on top, between the donut-shaped connector and the pulsator.
13. Remove six 12mm bolts and 4 nuts from intake manifold to cylinder head. The nuts are at the corners of the intake manifold, and the bolts are nestled between the fuel injectors. If you find yourself unbolting something above the level of the fuel rail, you’re in the wrong place. Have the magnetic grabber handy to fish out the bolts and the nuts as you remove them. A 12mm socket on your long extension fits beautifully between the fuel rail and the intake manifold assembly, and there’s even little notches on the fuel rail to make room.
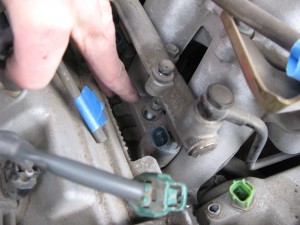
14. Before removing the intake manifold assembly, check to see if there are any stray cable mounting brackets, vacuum hoses, or support brackets still attached to the intake manifold. Trace the hoses/cables to make sure that they really do interfere with removal. Remove and label as necessary.
15. Carefully lift out intake manifold/injector assembly. This is best done with two people. Guide it around the corners, brackets, etc. Set it down in a clean location. You don’t want to get crud in the injector ports on the bottom, and you don’t want to scratch or gouge the polished mating surfaces.
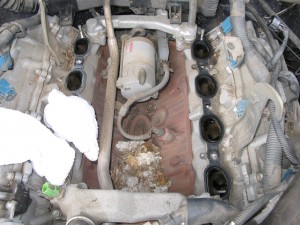
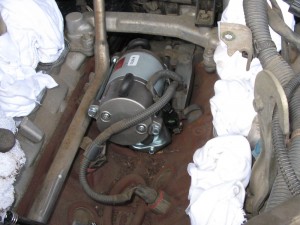
16. You are now looking at the starter nestled in the valley of the engine. In our case, a family of mice had made a nest in the head block. Before removing the gaskets, use a shop-vac to clean up any loose dirt/rust/etc. from around the head openings. Remove the gaskets from the head. Stuff rags into the openings to keep foreign bodies out of the cylinders. If you plan on reusing the gaskets, carefully set them aside.
17. Remove 12mm bolt connecting the wire harness to the starter. This bolt is reached from behind the engine. The bolt is hard to get to, as you have to reach your socket wrench between the firewall and the head block. You need to do this by touch, and there is hardly any room to operate the wrench. Again, your magnetic grabber is helpful here to retrieve the bolt as you remove it.
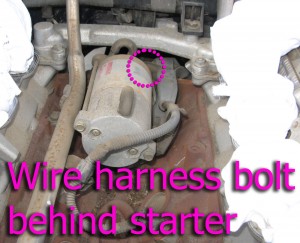
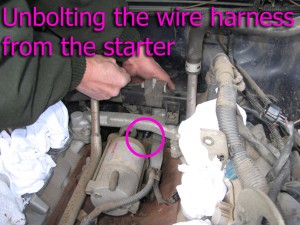
18. Remove the two 14mm bolts holding the starter to the block. Again, you reach these bolts from the back. These are even harder to get to than the bolt in step 17. If you need guidance, take a look at the bolt holes on your new starter to guide you. You’ll need to experiment with extensions and deep vs. regular sockets to get the best results. At least the heads on these bolts are extra long, which makes them easier to get to.
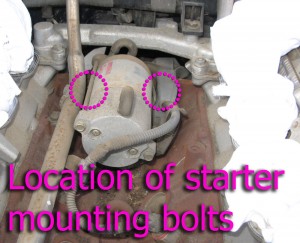
19. Once you’ve unbolted the starter, rotate starter counterclockwise a little bit and unplug the exciter wire and remove 12mm nut holding battery wire to starter. The nut is located under a cap.
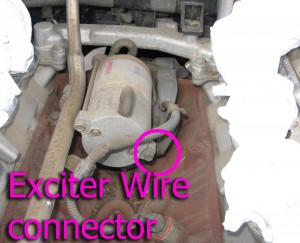
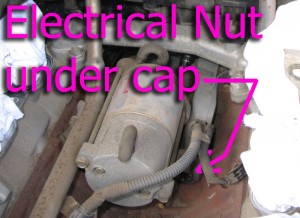
20. Here’s a photo of the new starter in place, showing the electrical connector nut and the socket for the exciter wire.
22. Clean the polished mating surfaces on the head block, the intake manifold assembly, and the throttle body. Don’t scratch or gouge. A little gas on a rag should do the trick.
23. It’s time to reassemble everything by following the steps in reverse order to install new starter. If you’re just replacing the solenoid contacts in your old starter, complete that project and then follow the steps in reverse. Don’t break off the little rubber snorkels on the starter; don’t worry if they’re folded over on the new starter. They’ll slowly unfold on their own.
24. When replacing the bolts in the new starter, they should be tightened to a torque setting of 29 foot-pounds. My torque wrench wouldn’t even fit in the tiny space, so I clamped a practice bolt in a shop vise and got the feel of how 29 ft/lbs feels before using the ratchet wrench to tighten the starter bolts.
25. Before replacing the intake manifold assembly, triple-check the head block openings to make sure absolutely nothing fell in there, then install your intake manifold gaskets. Guide the intake manifold into place and lower it onto the bolts at the corners. Again, another person makes this much easier.
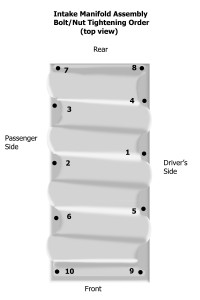
26. When tightening the bolts and nuts on the intake manifold assembly, tighten them to 13 foot-pounds using the torque wrench. Tighten the bolts and nuts in the following pattern, starting with 1, then 2, etc. Start on the driver’s side middle bolt and work in a clockwise circular pattern back and forth across the manifold.
27. After you’ve bolted the intake manifold assembly into place, finish reassembly by reversing the steps. When bolting the Throttle Body back onto the intake manifold, use your torque wrench to tighten the four nuts and bolts to 13 foot-pounds.
Final steps
When you’ve finished, carefully go through the engine and check for any hoses or connectors you may have missed. Check for stray tools or rags. Look for fuel leaks around the fuel injectors and the fuel line connectors. Remedy any problems that you see before starting the vehicle.
Try starting your truck. If everything went as planned, it should start right up and sound normal. Look under the hood and see if any fuel is leaking from around the fuel connectors or fuel injectors.
Troubleshooting
Fuel Injector o-ring replacement: If you managed to tear a fuel injector o-ring, you’ll see fuel leaking from around that location. In most cases, it’s the o-ring that seals the bottom of the injector in the intake manifold. You’ll need to replace all the bottom o-rings on that side of the intake manifold assembly (or top o-rings, if that’s what you broke). To replace the bottom o-rings, order a set of four for each side from the parts desk. While the intake manifold assembly is still out of the vehicle, unbolt the fuel rail and fuel connectors and carefully lift the rail and injectors away from the intake manifold. The tops of the injectors should still be in the fuel rail. Pull out the old o-rings from the holes in the intake manifold and use a Q-Tip to clean out the holes. Apply a very thin amount of plain vaseline to the new o-rings and place them into the holes in the intake manifold. Carefully lower the fuel rail with its dangling fuel injectors back onto the intake manifold, lining up the bottoms of the injectors so that they slip into the o-rings. Reattach the fuel rail. Use the torque wrench to tighten the fuel connector bolt to 29 foot-pounds.
Check Engine Light: If you notice that the “Check Engine” light comes on, then turn off the motor and get back under the hood. Once again, look for any fuel leaks around injectors, and triple-check all the electrical connectors and all the vacuum hoses.
Reset the “Check Engine” light by holding down the odometer button for about 10 seconds while turning the key to “on,” but don’t start the engine. Or, better yet, follow the steps described in your owner’s manual.
Try starting the truck again. The check engine light should remain off. If it comes back on, and you’re absolutely positive you’ve reconnected everything correctly, then something else is going wrong. Misfire, bad sensor…maybe you stepped on a connector while deep in the engine. You may need to have a mechanic hook up a computer to the diagnostic port and discover what’s causing the light to come on.
If you turn the key and the engine doesn’t start, then you’ll need to go online and research the problem further, as it probably wasn’t the starter at fault to begin with.
You’re done!
I hope this has been helpful. If it has, please leave a comment.
Comments
176 responses to “Toyota Tundra starter repair – A journey of discovery”
Hi, did the starter change last night. It took me 5 hours to finish. Your guide helped alot. I found that the things you said would give me trouble did not but other things sure did. The blue plugs came out easy but had a hell of a time with the starter wire nut. Did not have to replace the o-rings or gaskets. Thanks for your help.I might of been faster if i had not done the work by flashlight. You have to work with the time and stuff you have. For me it was working at night.
I removed my starter & had it rebuilt
you instructions were a great help.
This is on a 2003 Tundra 4.7 .My battery
is still going dead ,had the battery
checked at auto zone its ok .Whats the
possibility of the ignition switch is
bad & how do you remove it .This truck
only has 62,000 miles
Thank you for any help
thanks for your post saved a bunch doing it myself dont think i coud have done it without your guide thanks agin
Trying this procedure tomorrow. Will follow all your guidelines. Will let you know the outcome.
TNT I have a 2008 4.7 tundra starter problem. I followed the procedure here (great instructions) but I had a bolt through the wire harness on the back right side of the intake manifold that had me stumped a little. Took the camera phone took a pic behind the intake where you can’t feel let alone see. After reviewing pic saw the bolt☆.Removed the intake manifold right off. Also I removed the cooling water cross over to get the starter bolts easier. I lost a little antifreeze but well worth it. You can see one bolt and touch the other. Great write up. Saved me a bunch of money. Thanks for sharing. I would love to talk to toyota’s engineering about this. $!!%@. Hope this may help.
This was very helpful. Thanks so much. Steven Barber
One thing missed was that it’s a good idea, before disconnecting any fuel lines, to at least momentarily open the gas tank cap to relieve any built up pressure in the fuel system. This is especially true in warmer climates. Voice of experience….
Otherwise, this is by far the best guide for Tundra starter R & R I’ve seen. Many thanks!!
Thank you very much for the walk thru. Greatly appreciated
This was a very nice tutorial w/ the pictures. Really let me know where those pesky starter bolts where located.
Thank you
I just wanted to say thank you for posting this.saved me a lot of grief.
Excellent write-up! Thank you!
Some guy,
I just wanted to say thank you for this excellent post, this was very helpful and well documented. I had the same problem as Randy (comment 51) with the sucking sound. It turned out to be four small metal rings that were included in the new gaskets I bought at AZ once the metal rings were removed it starts and runs perfect again. Thank you very much!
Great write up as many have said. My 2002 Tundra is having starter problems. Sometimes when I turn the key, the starter doesn’t go. If I hold the key turned, it will eventually start, but if I let go of the key it won’t start. I assume it is a solenoid so I will be pulling the starter for a full rebuild.
So I have a question on step 12. I have the alldata procedure and they do not indicate the removing the fuel line at this point. Is the 2002 different from the 2001 in this case? I guess I’ll find out when I get in there, but I hope someone can comment before that.
Thanks, Brian
I have been living with the “click” for over 3 years. It always eventually started but I knew this was in my future. I ran into problems getting the bolts off the back of the engine. I have large hands. I ended up taking the wiring harness loose to give me a little extra room at the back of the block. I went with the O’rieley rebuilt for $69 out the door. My other “gotcha” was my latch on my airbox broke – A trip to the dealer…
Good job on the details for the procedure. You offered some good insight.
GR8 article, just want to add a few tips that will save a lot of ugly words…. Instead of disconnecting the fuel line at the pressure regulator, there is a union down just below that line about a foot(keeps from having to keep those little copper gaskets in check). Also, purchase two 35941 felpro gaskets and remove the water crossover pipe at the rear of the engine. This will give you soooo much more room to remove and reinstall those nasty starter mounting bolts!
I finished this project a few weeks ago, and the results are great. Like others have mentioned, Someguy’s description and photos are spot on, and remarkably helpful. I was also a little nervous starting this project, but it went smoother than I could have imagined.
My hands are modest size, so I didn’t have too much trouble with the starter bolts. I used a deep socket back there, and It fit fine.
One or 2 of the blue injector plugs were a little resistant to remove, but gentle persistence paid off…I was able to get all 8 without damaging any o-rings. If they seem stuck, then just keep wiggling while pressing on the little release-catch. I used a pair of needle-nosed pliers for one of them, but be careful about applying too much pressure, as these seem like delicate & pricey little things!
I also had the squirrel’s nest on top of the engine block. When pulling off the engine block, be very careful that none of this debris falls down into the intake ports. I also had sand and grit in this area from years of winter driving. I thought after, that it might be a good idea to blow this area out with compressed air before starting the job, but this could create more problems than help…not sure.
I had my original Denso starter rebuilt at a local shop. This didn’t really save me any money, but it was the quickest way for me to get a re-built Denso unit, which had lasted me 300k original kms. After I finished the job, the truck started up right away. Oddly, a couple of days later when I went to start it again in the garage, all I could here was that annoying click of the solenoid!
A day later, it started fine. The day after that a click…what the heck? I was puzzled. A couple of days later it started fine, and has been ever since, and I have been confidently driving here and there, with plenty of stops and starts. My guess (and only a guess!), is that the new contacts and brushes needed a few times to “bed” in, and now that they are, I have no problems. Again, this is my theory, which could indeed be completely bogus.
Regardless, someguy’s instructions are brilliant, and helped to make me now much more confident at dealing with repair challenges to my aging vehicles. Someguy, I hope you’re doing well, as I haven’t seen any posts from you here in a couple of years. Your contribution has benefitted the lives of many Tundra owners!
i had a mechanic put starter inmy toyota corolla I had sincw 2009 never had to take to shop never broke down but now I can cnot deivw car it goes into revwrsw too fasr and drives forwaed without stopping too fast almost killed my daughter getting off feeeway and would not stop what is the problem
Wow, that’s scary. This is a life-safety issue–don’t drive the car! Have it towed to a mechanic you trust and have them go over it with a fine-tooth comb. Changing the starter shouldn’t have done anything to the other systems. Perhaps the first mechanic unplugged a sensor into the transmission and didn’t reconnect it?
sorry,early in the morning with spelling freeway,reverse,forward
Changed starter everything is back together but now it skipping. What did I do?
Double check all the sensor connectors, the connectors on the fuel injectors, and vacuum hoses.
This is an amazing guide! A question (and then the back story): without taking apart the engine, is it possible to hit the starter with a hammer? Or anything heavy, or any shape?
My 2000 Tundra developed an electrical problem in a rain storm a few days ago, secondary to a leaky gasket in the windshield. The result was a short circuit, such that while I was sleeping the starter started to crank. My neighbor woke me to tell me the truck was possessed. It was pretty freaky. I started the truck and the starter continued to crank while the truck was running, and the engine would stall out, then restart. So I just disconnected the battery. After drying things for a day and recharging the battery, it appeared the ignition switch was dead, so I replaced that this evening. That was the first repair I’ve ever done on my own — it was awesome. With the ignition replaced, current is passing to the starter, and it’s dead – no cranking at all. I’m hopeful if I can bang on the starter it might crank (this apparently is a pretty common way to get a tiny bit more life out of it). I did this repair in the dark, and I couldn’t see any access to the starter motor, to bang on it. From what you describe in this post, it seems as though even if I pull off the skid plate to come in from underneath, I might be foiled.
Any other suggestions welcomed! And thanks!!!
Nope…the starter is completely entombed under the manifold and nestled in the valley of the cylinder heads. When you take the starter out, take it to the local parts store and have them test it. It may just have a burned-out solenoid, which is cheaper to replace than the whole starter.
very accurate information and helpful hints. A very useful tool
This was awesome help. I just wish I had seen it before I took it apart. I removed the coolant bypass that’s on top of the starter to get to that rear bolt. Found out it was not that difficult if I would have left in on. Anyway very very helpful. Thanks. Now I have to replace water pump. It started grinding and heating up right after I started it. Thanks, thanks thanks.
I think that it’s pretty amazing you took the time to do this I am really impressed with what i have read especially for a first time major fix CONGRATS On a job well done and this is coming from someone that works on cars quite often the only advice I have is loosen gas cap before to depressurize the system some of you will be very glad you did it.. Also to everyone out there that read this incredible how to thread if you take the manifold off just buy new gaskets it’s really not worth having to go back in 10xxx miles later cause of a $20-$30 Set of gaskets
superb, back up and running, replaced knock sensor
So, I stumbled on this walkthru. Gotta give you credit. You saved me a bunch of money! Definitely worth the aggravation! Lol seriously, thank you for a great step-by-step!
Came across this searching for removal of intake manifold removal to replace knock sensors. I had no idea this is where the starter was located. Haven’t had a problem with the starter but, with over 100K miles maybe I should replace along with the sensors? If not I’ll at least know how to do this. Thank you.
thanks , very helpful , saved me a bunch of time. thanks again , Tony
Done in four hours. This made me feel like a auto mechanic.
I had this done two years ago by our local mechanic. $800 and he used a Napa reman plus he left a bonus rag under the manifold and didn’t tighten one of the manifold bolts. When I took it back he said he would check if it was under warranty and get back to me. Of course he never did. So I considered doing it myself and luckily landed on this site.
Please email me your mailing address. I would like to send some guy in Nevada a gift.
Here is a great source for the removal of the starter. I have a 2004 Sequoia which is the exact duplicate of the above. Took me about 2 hours to removal, me being very careful and referring to this website during the process. Thank you for posting
Hi there someguyinnevada,
Just to let you know that you are a Superstar! I came from Australia where I recently emigrated to check on my house in California. Our Toyota Sequoia had been sitting outside for the best part of 2 years and no one had been able to fix it. I googled the symptoms (the single “clack” sound when trying to start) and landed on your website before giving it a go I asked a mechanic and he wanted to charge me $400 + parts. I did the job following your instructions “a la lettre”. When after connecting my battery I felt a lump in my stomach: had all the work been in vain? No, the engine started right away! Thanks for making my day, I can now sell the car! Geoff
i did everything as u said and my problems the starter wouldnt turn for mr to get in the the bolts and finlly got it and my starter broke off in it now not sure what to do
This is the best tutorial I have seen. Thanks. It was a great help
I come from a family of mechanics. When I found out what this entailed I had flash backs of many week ends being accused by my “junkyard ” widow of neglect while at the same time secretly enjoying the torturous job of complete frame up restorations of a 49 Dodge business coupe and a 49 Chevy 3/4 ton PU.
When I was told by the dealer it would be 800 dollars, oddly enough I said when can you get it done. I guess that means I am a strange duck but I enjoyed reading the post (s) anyway and I must say I like the cut of your jib JB. Thanks and best wishes. Well done!🙂
It’s a job for patience, thats for sure. The engine bay is large and reaching all those parts gets a bit old. I covered the fenders and radiator with towels and a thick small rug over the front helps on your stomach. Haven’t heard one person mention the sticky goop I encountered at the lower end of the intake ports and into the valve areas. Mine was so bad I used micro cloths and gas to wipe out the gooey build up. (189k miles) Thanks for taking the time to post this good write up. Taking the wire off the starter was a chore (counterclockwise turn) and I hope its a wee bit easier putting it back on.
Thank you, thank you, thank you!
I am a commercial fisherman, I have been the owner operator of a commercial fishing vessel for over 20 years, during that time I have never hired a mechanic to repair my engines, I have done all the repairs maintenance myself.
My tundra starter went out, I thought simple fix, went under the vehicle spent a hour looking for the damn thing, came across your website, disgusted and amazed toyota put the starter buried under the exhaust manifold.
Long story short thank you for a beautifully written article on how to replace the starter. You saved me precious hours that I need to keep my commercial fishing boat in operation.
Thank you, thank you, THANK YOU!!
Owner operator fishing vessel, “And Then Some”
Captain Jim
Thank you sir for taking the time to create this excellent tutorial. I know that you saved me countless hours and several hundred dollars. Not sure if you are a technical writer, but you should be. Took me about 4 hours this afternoon and thanks to your guidance all went smooth.
Thank you so much for such a step-by-step informative video!!! You are the MAN, from Nevada!!
I did not delve into my truck as far as you covered but did learn a lot more about my truck than I ever have!
You are a life saver; yours was the ONLY informational site that specifically addressed this!
I hope your truck is running like a top!
Thanks again!
Use Vaseline on the intake bolts heads and nuts help,s , to keep them from falling great info thanks for the wed site . 12/23/16
Excellent Job, a very detailed and informative step by step procedure on a otherwise difficult procedure. Thank you for posting this as it saved me numerous hours and possible mistakes.
I just completed a tundra starter replacement and considered writing one of these tutorials initially but thought…Nah somebody has probably already done it and a much better job….YUP!…i wish i had found this in the first place…your instructions are GREAT…especially the o-rings advice!…today i found fuel leaking…now i know why…THANKS!
Thanks for the info! Just got my starter out , waiting for the new one to reassemble. One thing that went wrong with mine was the starter housing broke and was still stuck in the hole with a bearing and part of the shaft in it. I was going to rebuild the starter but ended up having to order a new one anyways.
Like another guy in an above comment i have very large hands and ended up having to move the wiring harness. I also had to move the coolant flange out of the way. What a pain in the *$$! This is the only major part i have had to change other than the alternator . Pretty good considering how long I’ve had this 2000 tundra, it now has 428,000 kms !